
Introduction
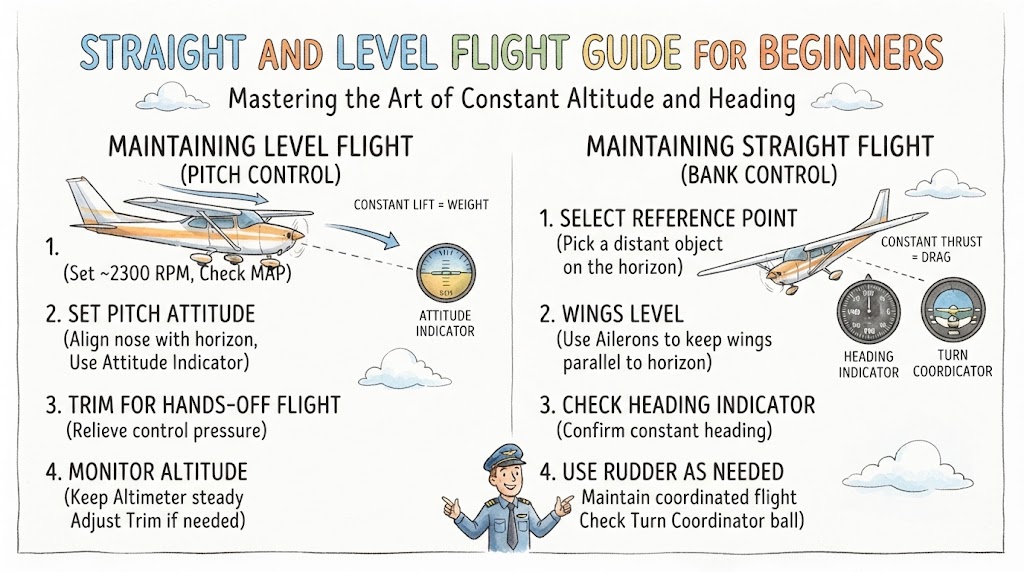
Straight and level flight is one of the most important skills a beginner pilot must learn because it forms the foundation of nearly every other flight manoeuvre. The objective is to maintain a constant altitude, a steady heading, an appropriate airspeed, and coordinated flight. Although the manoeuvre may appear simple, accurate straight and level flight requires careful use of pitch, power, trim, outside visual references, and flight instruments.
Understanding Straight and Level Flight
Straight and level flight means the aircraft is maintaining:
- A constant altitude
- A constant heading
- A stable airspeed
- Wings approximately level
- Coordinated flight
The word straight refers to maintaining the selected direction or heading. The word level refers to maintaining altitude rather than keeping the aircraft’s nose visually level with the horizon.
The exact nose position can vary between aircraft and flight conditions. An aircraft may maintain level flight with its nose slightly above or below a particular visual reference depending on:
- Aircraft design
- Airspeed
- Weight
- Power setting
- Centre of gravity
- Flap configuration
- Atmospheric conditions
Students should therefore learn the correct visual attitude for the aircraft they are flying.
Why Straight and Level Flight Matters
Straight and level flight is used during:
- Cruise flight
- Navigation exercises
- Training-area operations
- Airspace transitions
- Traffic-pattern positioning
- Instrument demonstrations
- Communication and checklist activities
A pilot who cannot maintain altitude and heading accurately may struggle with climbs, descents, turns, approaches, navigation, and instrument flying.
This exercise teaches the student how to divide attention between aircraft control, outside observation, flight instruments, traffic awareness, and navigation.
The Four Forces in Level Flight
Four main forces act on an aircraft in flight:
- Lift
- Weight
- Thrust
- Drag
In steady, unaccelerated level flight, lift generally balances weight while thrust generally balances drag.
This does not mean the forces disappear. They continue acting on the aircraft, but their effects are balanced closely enough for the aircraft to maintain altitude and airspeed.
Lift and Weight
Lift acts mainly upward, while weight acts toward the earth.
To maintain altitude, the aircraft must produce enough lift to support its weight. Lift is affected by factors such as:
- Airspeed
- Angle of attack
- Air density
- Wing shape
- Aircraft configuration
- Aircraft weight
Thrust and Drag
Thrust moves the aircraft forward, while drag opposes its movement through the air.
When thrust and drag are balanced, the aircraft can maintain a stable airspeed. Increasing or decreasing power changes this balance and may also affect pitch, trim, and altitude.
Pitch, Power, and Trim
Straight and level flight depends on the coordinated use of pitch, power, and trim.
Pitch
Pitch controls the aircraft’s nose attitude. Small pitch changes can affect:
- Altitude
- Airspeed
- Angle of attack
- Vertical speed
The pilot normally uses the elevator control to establish the desired pitch attitude.
Power
Power influences the amount of thrust produced by the engine.
Increasing power generally creates a tendency for the aircraft to accelerate, climb, or both, depending on how the pilot controls pitch. Reducing power may cause the aircraft to slow down, descend, or both.
Trim
Trim reduces the continuous control pressure required to maintain the selected attitude.
The correct sequence is:
- Establish the desired attitude using the primary flight controls.
- Set the required power.
- Allow the aircraft to stabilise.
- Use trim to remove sustained control pressure.
Trim should not be used as the primary control for changing altitude or attitude.
| Control Element | Main Purpose | What the Student Should Monitor | Common Beginner Error |
|---|---|---|---|
| Pitch | Establishes the required flight attitude | Horizon reference, altitude, airspeed, vertical trend | Making large or abrupt pitch corrections |
| Power | Supports the desired airspeed and flight condition | Airspeed, engine instruments, altitude trend | Changing power without anticipating pitch effects |
| Trim | Removes sustained control pressure | Control feel, attitude stability, airspeed | Using trim to fly the aircraft instead of the elevator |
| Rudder | Maintains coordination and directional balance | Balance indicator, outside references, heading | Ignoring yaw during power changes |
| Ailerons | Control bank and keep the wings level | Wing position, heading, turn indications | Overcorrecting small bank changes |
Establishing the Correct Flight Attitude
The correct straight and level attitude should first be recognised using outside visual references.
A student may compare:
- The aircraft nose position with the horizon
- The distance between the horizon and the top of the instrument panel
- The position of each wingtip relative to the horizon
- The aircraft’s direction relative to a distant reference point
The exact sight picture depends on the seating position and aircraft type.
Students should adjust their seat correctly before flight because a different eye position can change the apparent relationship between the aircraft and the horizon.
Using Outside Visual References
Outside references are essential during visual flight.
A student should select a distant point in the intended direction of travel. This reference helps detect:
- Unwanted heading changes
- Small bank angles
- Yaw
- Drift caused by wind
The horizon helps the pilot judge pitch and bank attitude. If one wingtip appears lower than the other relative to the horizon, the aircraft may be banking.
The pilot should continue scanning for:
- Other aircraft
- Birds
- Terrain
- Weather
- Airspace boundaries
- Suitable landing areas
- Navigation features
A student should not concentrate on one outside point for too long. The visual scan must cover the entire relevant area.
Using Flight Instruments
Flight instruments confirm whether the selected outside attitude is producing the desired result.
Students should avoid staring at a single instrument. Instead, they should use a regular scan that combines outside references with short instrument checks.
Attitude Indicator
The attitude indicator displays pitch and bank attitude.
It helps confirm whether the aircraft is:
- Nose-high or nose-low
- Wings-level or banked
- Returning correctly to level flight
Altimeter
The altimeter indicates altitude.
Small altitude changes should be corrected early. However, students should avoid reacting aggressively to every minor movement.
Airspeed Indicator
The airspeed indicator shows whether the aircraft is maintaining the intended speed.
A change in airspeed may result from:
- A pitch change
- A power change
- Turbulence
- A change in aircraft configuration
- A climb or descent
- Wind-related changes in flight conditions
Heading Indicator
The heading indicator helps the pilot maintain the selected direction.
The student should compare the indicated heading with outside references and navigation requirements.
Vertical Speed Indicator
The vertical speed indicator shows whether the aircraft is climbing, descending, or approximately level.
Because the instrument may respond with some delay, it should be used to confirm a trend rather than as the sole basis for immediate control inputs.
Turn Coordinator or Turn-and-Slip Indicator
This instrument helps detect unwanted turns and poor coordination.
The pilot should use coordinated aileron and rudder inputs to keep the aircraft balanced.
| Instrument or Reference | Primary Information | Student Use in Straight and Level Flight |
|---|---|---|
| Outside horizon | Pitch and bank attitude | Establish the basic sight picture |
| Distant reference point | Direction and heading trend | Detect unwanted turns or drift |
| Attitude indicator | Pitch and bank confirmation | Verify the outside attitude |
| Altimeter | Altitude | Identify gradual altitude changes |
| Airspeed indicator | Airspeed | Confirm stable performance |
| Heading indicator | Heading | Maintain the selected direction |
| Vertical speed indicator | Climb or descent trend | Confirm whether altitude is changing |
| Balance indicator | Coordination | Detect slip or skid |
Entering Straight and Level Flight
Straight and level flight may be entered from:
- A climb
- A descent
- A turn
- Another straight and level condition at a different airspeed
The pilot should anticipate the transition rather than waiting until the aircraft passes the desired altitude or heading.
Levelling Off From a Climb
When approaching the selected altitude:
- Begin lowering the nose toward the level-flight attitude before reaching the altitude.
- Maintain directional control.
- Allow the aircraft to accelerate.
- Reduce power toward the appropriate cruise setting.
- Confirm altitude, heading, and airspeed.
- Retrim the aircraft.
Reducing power too early may prevent the aircraft from accelerating normally.
Lowering the nose too late may cause the aircraft to climb above the selected altitude.
The amount of lead needed depends on:
- Rate of climb
- Aircraft responsiveness
- Pilot technique
- Turbulence
- Aircraft weight
Levelling Off From a Descent
When approaching the selected altitude:
- Raise the nose smoothly toward the level-flight attitude.
- Add the required power.
- Maintain heading and coordination.
- Allow the airspeed to stabilise.
- Confirm the selected altitude.
- Retrim the aircraft.
Adding power too late may allow the aircraft to descend below the target altitude.
Raising the nose abruptly may create an uncomfortable manoeuvre and an excessive airspeed reduction.
Rolling Out From a Turn
When returning to straight flight from a turn:
- Look toward the desired heading.
- Begin reducing bank before reaching the selected heading.
- Use coordinated aileron and rudder.
- Return the wings smoothly to level.
- Adjust pitch if altitude changed during the turn.
- Confirm heading, altitude, airspeed, and coordination.
A student should anticipate the rollout because the aircraft continues turning while the wings are being levelled.
Maintaining Altitude
Maintaining altitude requires the pilot to recognise small deviations early.
If the aircraft begins to climb:
- Check the outside pitch attitude.
- Confirm the trend using the altimeter and vertical speed indicator.
- Apply a small corrective pitch input.
- Allow the aircraft to respond.
- Return to the normal level-flight attitude.
- Retrim only after the aircraft is stable.
If the aircraft begins to descend, use the same process in the opposite direction.
Large corrections usually cause the aircraft to move through the desired altitude and create repeated oscillations.
Maintaining Heading
Heading control depends on:
- Wings-level attitude
- Coordinated rudder use
- Outside reference points
- Instrument confirmation
- Awareness of power-related turning tendencies
If the aircraft begins turning:
- Identify the direction of the bank.
- Apply a small coordinated correction.
- Return the wings to level.
- Check the outside reference.
- Confirm the heading.
Students should avoid holding continuous aileron pressure after the wings are level.
Maintaining Airspeed
In stable straight and level flight, airspeed is influenced by power, pitch, aircraft configuration, and atmospheric conditions.
To correct an unwanted airspeed change:
- Check the power setting.
- Confirm the pitch attitude.
- Check whether the aircraft is climbing or descending.
- Review the aircraft configuration.
- Make a small correction.
- Allow time for the aircraft to stabilise.
Students should not chase the airspeed indicator with repeated control movements.
The correct power setting and attitude must come from the instructor and the aircraft’s approved operating information.
Understanding Coordination
Coordinated flight means the aircraft is not slipping or skidding unnecessarily.
During coordinated straight and level flight:
- The wings remain approximately level.
- The aircraft follows its intended direction.
- The balance indicator remains centred or near its normal position.
- The pilot does not feel unnecessary sideways movement.
Power changes may create yaw, especially in single-engine propeller aircraft. The pilot may need rudder input to maintain coordination.
Incorrect rudder use can produce:
- Unwanted heading changes
- Slips
- Skids
- Increased drag
- Passenger discomfort
- Poor control accuracy
The Importance of Trim
A properly trimmed aircraft is easier to control accurately.
Without correct trim, the pilot may:
- Apply excessive control force
- Become physically tired
- Make unintentional pitch changes
- Struggle to maintain altitude
- Divide attention poorly
- Overcontrol the aircraft
After every significant change in power, speed, configuration, or attitude, the aircraft may require retrimming.
The student should remember:
Attitude first, power as required, stabilise, and then trim.
Visual Flight Scan Technique
A good scan alternates between outside observation and short instrument checks.
A simple scan may include:
- Look ahead and check the horizon.
- Scan the left side for traffic.
- Check the left wing position.
- Look ahead again.
- Scan the right side for traffic.
- Check the right wing position.
- Briefly check altitude, airspeed, and heading.
- Return attention outside.
The exact scan should be taught and refined by the flight instructor.
The pilot should not use the instrument panel as the main reference during normal visual flight unless conditions or training requirements make it necessary.
Effects of Power Changes
A power change may affect more than airspeed.
Increasing power can produce:
- A tendency to pitch
- Yaw
- Acceleration
- A climb tendency
- Changes in engine noise and vibration
Reducing power can produce:
- Deceleration
- A descent tendency
- A pitch change
- Changes in trim requirement
- Reduced engine noise
The specific reaction depends on aircraft design.
Students must anticipate these changes and use coordinated control inputs rather than reacting after the aircraft has already deviated significantly.
Effects of Airspeed Changes
Straight and level flight can be maintained at different airspeeds, but each speed may require a different combination of:
- Power
- Pitch attitude
- Angle of attack
- Trim
- Control pressure
At a slower airspeed, the aircraft may require a higher nose attitude and greater angle of attack to maintain altitude.
At a higher airspeed, the aircraft may maintain level flight with a lower nose attitude.
Students must remain within all approved operating limits and use speeds selected by the instructor or aircraft documentation.
Straight and Level Flight at Slow Speed
Slow flight requires greater attention to:
- Airspeed
- Angle of attack
- Stall awareness
- Coordination
- Power
- Trim
- Control effectiveness
As the aircraft slows, controls may feel less responsive, and larger control movements may be required.
However, slow flight is a separate training exercise and should be performed only with a qualified instructor using aircraft-specific procedures.
Effects of Wind
Wind affects the aircraft’s path over the ground but does not always change its heading in the same way.
A pilot may need to use a wind-correction angle to maintain a desired ground track.
This means:
- The aircraft may point in one direction.
- The actual path over the ground may be different.
- A heading can remain constant while the aircraft drifts sideways.
Students should understand the difference between:
- Heading: The direction in which the aircraft’s nose points.
- Track: The actual path followed over the ground.
During navigation, the objective may be to maintain a particular track rather than simply holding one heading.
Effects of Turbulence
Turbulence may cause temporary changes in:
- Altitude
- Airspeed
- Heading
- Bank angle
- Vertical speed
Students often make the mistake of trying to correct every small movement.
In light turbulence, it may be better to:
- Maintain the general attitude.
- Use small control inputs.
- Avoid chasing instruments.
- Accept minor temporary deviations.
- Follow the instructor’s guidance.
- Use an appropriate turbulence speed when required by aircraft procedures.
Aircraft limitations and manufacturer instructions must always be followed.
Factors Affecting Straight and Level Performance
Several conditions can change the pitch and power needed for level flight.
Aircraft Weight
A heavier aircraft may require more lift and power for the same flight condition.
Centre of Gravity
Centre-of-gravity position can affect:
- Stability
- Control pressure
- Trim requirement
- Aircraft handling
The aircraft must remain within approved weight-and-balance limits.
Density Altitude
High temperature, high altitude, and low air density can reduce aircraft performance.
The aircraft may:
- Accelerate more slowly
- Require different power management
- Have reduced climb capability
- Produce different true airspeed for an indicated airspeed
Configuration
Flap or landing-gear changes affect lift, drag, pitch, and trim.
A configuration change normally requires the pilot to re-establish the desired attitude and retrim.
Engine Performance
Engine power may vary with:
- Altitude
- Temperature
- Mixture setting
- Engine condition
- Propeller setting
- Aircraft system configuration
Students must monitor engine instruments and follow aircraft-specific operating procedures.
Common Beginner Mistakes
Looking Inside for Too Long
Students may focus on the instruments and stop scanning for traffic.
Correction: Use short instrument checks and return attention outside.
Fixating on One Instrument
Watching only the altimeter or heading indicator can cause other parameters to drift.
Correction: Use a balanced scan.
Making Large Corrections
Large control movements can create repeated altitude and heading changes.
Correction: Make small inputs and wait for the aircraft to respond.
Chasing the Altimeter
The student may repeatedly raise and lower the nose after minor altitude changes.
Correction: Re-establish the correct outside attitude and confirm the trend.
Forgetting to Trim
Continuous control pressure makes precise flight more difficult.
Correction: Stabilise the aircraft and then trim.
Trimming Before Stabilising
Using trim while the aircraft is still changing speed or attitude can lead to poor control.
Correction: Establish attitude and power first.
Failing to Maintain Coordination
Ignoring rudder may allow the aircraft to yaw or fly out of balance.
Correction: Use coordinated aileron and rudder inputs.
Holding Unwanted Bank
A small bank may go unnoticed and cause a gradual heading change.
Correction: Compare both wingtips with the horizon.
Incorrect Seat Position
A different eye position changes the outside sight picture.
Correction: Adjust the seat consistently before flight.
Ignoring Power Effects
Changing power without correcting pitch, yaw, or trim may cause altitude and heading deviations.
Correction: Anticipate aircraft reaction before moving the throttle.
Overcontrolling in Turbulence
Trying to correct every small disturbance can make the flight less stable.
Correction: Maintain the general attitude and use smooth inputs.
Poor Lookout
Concentrating only on aircraft control increases collision risk.
Correction: Maintain an organised traffic scan throughout the exercise.
Safety Considerations
Straight and level flight still requires continuous situational awareness.
Students should monitor:
- Traffic
- Terrain
- Weather
- Fuel
- Airspace
- Navigation
- Engine instruments
- Cloud clearance
- Aircraft limitations
- Communication requirements
A stable aircraft does not mean the pilot can stop actively managing the flight.
The pilot should also know:
- The nearest suitable landing areas
- The current position
- The planned route
- The applicable altitude restrictions
- The aircraft’s fuel state
- Relevant emergency procedures
Instructor-Supervised Training Exercise
This exercise should be completed with a qualified flight instructor in a suitable training area.
Learning Objectives
The student should learn to:
- Recognise the correct straight and level attitude
- Maintain a selected altitude
- Maintain a selected heading
- Use power correctly
- Trim the aircraft
- Divide attention between outside references and instruments
- Make small and timely corrections
- Maintain coordinated flight
Exercise Sequence
- Establish a safe training altitude.
- Complete the required lookout and checks.
- Select a heading and altitude.
- Establish the correct outside pitch attitude.
- Set the appropriate power.
- Allow the airspeed to stabilise.
- Trim the aircraft.
- Maintain the selected heading using a distant reference.
- Confirm altitude and airspeed with the instruments.
- Practise small altitude corrections.
- Practise small heading corrections.
- Change to another approved cruise airspeed.
- Re-establish attitude, power, and trim.
- Return to the original flight condition.
- Review performance with the instructor.
Student Self-Review
After the exercise, ask:
- Did I maintain an effective lookout?
- Did I recognise the correct visual attitude?
- Did I use small corrections?
- Did I maintain heading accurately?
- Did I control altitude without chasing the instruments?
- Did I use rudder correctly?
- Did I trim after stabilising?
- Did I divide attention effectively?
- Did I monitor engine instruments?
- What should I improve on the next flight?
Straight and Level Flight Checklist
Use this simple memory sequence:
- Look outside.
- Select the heading and altitude.
- Establish the correct attitude.
- Set the required power.
- Maintain coordination.
- Allow the aircraft to stabilise.
- Check airspeed.
- Trim away control pressure.
- Confirm heading and altitude.
- Continue the traffic scan.
- Make small corrections.
- Recheck engine instruments.
This checklist is a learning aid and does not replace the aircraft checklist.
Frequently Asked Questions
1. What does straight and level flight mean?
It means maintaining a constant heading, altitude, and stable flight condition without an intentional climb, descent, or turn.
2. Does level flight mean the aircraft’s nose is exactly on the horizon?
No. The correct nose position depends on the aircraft, airspeed, power, weight, configuration, and pilot seating position.
3. Which control is used to maintain altitude?
The elevator controls pitch attitude, but altitude control also depends on power, airspeed, trim, and overall aircraft energy.
4. Why does the aircraft lose altitude when power is reduced?
Reducing power decreases thrust. Unless the pilot adjusts pitch or another factor changes, the aircraft may slow down, descend, or both.
5. Why is trim important in straight and level flight?
Trim removes continuous control pressure, reduces workload, and helps the pilot maintain a stable attitude more accurately.
6. Should a student watch the altimeter continuously?
No. The pilot should use outside references and a balanced instrument scan rather than staring at one instrument.
7. How should small altitude errors be corrected?
Use a small pitch correction, confirm the aircraft’s response, return to the normal level attitude, and retrim only after stabilising.
8. Why does the aircraft turn even when the pilot does not intend to turn?
A small unnoticed bank, wind, poor coordination, turbulence, or power-related yaw may cause a gradual heading change.
9. What is the difference between heading and track?
Heading is the direction the aircraft points. Track is the actual path it follows over the ground, which may be affected by wind.
10. Why must straight and level procedures be aircraft-specific?
Different aircraft have different control responses, power settings, trim systems, limitations, and visual attitudes. Students must follow their instructor and approved aircraft documentation.
Key Takeaways
- Straight and level flight is a foundation skill for all pilots.
- Straight refers to heading, while level refers to altitude.
- Pitch, power, trim, rudder, and ailerons must be coordinated.
- Outside visual references should remain the main guide during visual flight.
- Instruments confirm the aircraft’s performance.
- Small corrections are usually more effective than large movements.
- Trim should be used only after the aircraft is stabilised.
- A good scan includes traffic, attitude, altitude, heading, airspeed, and engine instruments.
- Wind affects ground track even when heading remains constant.
- Turbulence should be handled with smooth control inputs.
- Aircraft-specific procedures and limitations must always be followed.
- Regular supervised practice develops accuracy and confidence.
Conclusion
Straight and level flight may look simple, but it requires continuous attention, coordination, and accurate control. By learning the correct visual attitude, using pitch and power effectively, trimming the aircraft, maintaining an organised scan, and making small corrections, beginners can build a strong foundation for more advanced flying exercises. LearnFlying.com provides beginner-friendly aviation education, but practical instruction from a qualified flight instructor remains essential.

