
Introduction
Learning to turn an aircraft smoothly is one of the first major skills developed during flight training. Although a turn may appear simple from the ground, the pilot must manage several things at the same time: bank angle, pitch attitude, airspeed, altitude, coordination, heading, traffic, and outside visual references.
A good turn is not created by moving the control wheel or stick alone. The pilot normally coordinates aileron and rudder to establish the bank, uses elevator pressure to manage pitch and altitude, and adjusts power when required. The pilot must also continue scanning outside for other aircraft.
This LearnFlying.com guide explains how an aircraft turns, what each flight control does, how to maintain a coordinated turn, and which common mistakes student pilots should avoid.
The information is intended to support ground study. Actual turning manoeuvres should be learned and practised with a qualified flight instructor in accordance with the aircraft’s approved operating information.
What Makes an Aircraft Turn?
An aircraft turns because its lift force is tilted when the wings are banked.
In straight-and-level flight, most of the lift produced by the wings acts vertically to oppose the aircraft’s weight. When the pilot banks the aircraft, the total lift force tilts with the wings. That tilted force can be considered as having two components:
- A vertical component that helps support the aircraft’s weight
- A horizontal component that pulls the aircraft into the turn
The horizontal component changes the aircraft’s flight path. The greater the bank angle, the larger the horizontal component can become, provided that sufficient total lift is maintained.
However, banking also reduces the amount of lift acting directly upward. In a level turn, the pilot normally needs to increase total lift to prevent the aircraft from descending. This is commonly achieved through an appropriate increase in angle of attack using elevator input. Depending on the aircraft and manoeuvre, additional power may also be needed to maintain airspeed and altitude.
Think of total lift as an arrow pointing upward in straight flight. When the aircraft banks, the arrow tilts. Part of it continues to support the aircraft, while another part pulls it sideways into a curved flight path.
Flight Controls Used During a Turn
An accurate turn requires coordinated control rather than one isolated input.
| Flight Control | Primary Effect | Role During a Turn | Common Student Mistake |
|---|---|---|---|
| Ailerons | Control roll | Establish, adjust, and remove bank | Holding unnecessary aileron after reaching the desired bank |
| Rudder | Controls yaw | Supports coordination and counters adverse yaw | Using too much or too little rudder |
| Elevator | Controls pitch | Helps maintain altitude and manage airspeed | Pulling excessively or allowing the nose to fall |
| Throttle or power lever | Controls engine power | Helps manage energy and airspeed | Forgetting that steeper level turns may require more power |
Ailerons
The ailerons are the primary controls used to roll the aircraft into and out of a bank.
To begin a left turn, for example, the pilot applies left aileron. One aileron moves upward while the other moves downward, creating a difference in lift between the wings. This causes the aircraft to roll left.
Once the desired bank angle has been established, the pilot generally reduces or neutralises the aileron input. Continuing to hold the original input may cause the bank to keep increasing.
Small corrections may still be required because aircraft stability, turbulence, trim, power, and other factors can affect the bank.
Rudder
The rudder controls yaw around the aircraft’s vertical axis.
When the pilot applies aileron, the wing producing more lift also normally produces more drag. This can make the nose initially yaw opposite the intended turn, a tendency known as adverse yaw. Coordinated rudder input helps the aircraft roll and turn without unwanted sideways motion.
The rudder should not normally be used as the primary control for forcing the aircraft around a turn. Excessive rudder can create a skid, particularly when combined with insufficient bank.
Elevator
The elevator controls pitch and influences angle of attack.
As the aircraft banks, part of the lift is redirected horizontally. To maintain altitude in a level turn, the pilot usually applies enough back pressure to increase total lift and preserve the required vertical component.
Too little back pressure may allow the nose and altitude to fall. Too much may cause the aircraft to climb, lose airspeed, or approach a stall.
Power
A turn can increase induced drag, particularly when the pilot increases angle of attack to maintain altitude. Some aircraft may therefore require a small power increase during a level turn.
The amount of power needed depends on factors such as:
- Aircraft type
- Airspeed
- Bank angle
- Weight
- Density altitude
- Desired flight path
Student pilots should use the technique taught by their instructor and follow the aircraft POH or AFM.
Understanding Bank Angle
Bank angle is the angle between the aircraft’s lateral axis and the natural horizon.
Training terminology commonly groups turns into shallow, medium, and steep categories. Exact descriptions can vary between training systems and aviation authorities.
Shallow turns
A shallow turn uses a relatively small bank angle. Many aircraft have enough natural lateral stability to reduce the bank unless the pilot maintains it with light control pressure.
These turns are useful for small heading changes and gentle manoeuvring.
Medium-bank turns
In a medium turn, the aircraft is often more willing to maintain the selected bank angle after the controls are approximately neutralised.
Student pilots commonly use medium turns while learning heading control, traffic patterns, and basic visual manoeuvres.
Steep turns
Steep turns require greater attention to pitch, power, coordination, airspeed, and bank angle. The FAA’s Airplane Flying Handbook describes steep turns as generally involving approximately 45 degrees of bank or more, although the exact bank used during training depends on the applicable standard.
As bank angle increases in a level turn, load factor increases. The aircraft must produce more total lift, and its stall speed rises. For example, FAA training material explains that a coordinated level turn at 60 degrees of bank produces a load factor of approximately 2G, with stall speed about 41 percent higher than the 1G stall speed. This is an aerodynamic example, not a recommended training bank angle.
Bank Angle, Turn Rate, and Turn Radius
Turn performance is affected by both bank angle and airspeed.
At the same airspeed:
- Increasing the bank generally increases the rate of turn.
- Increasing the bank generally reduces the turn radius.
- Increasing the bank in level flight increases load factor.
- A higher load factor increases stall speed.
At the same bank angle:
- A faster aircraft has a larger turn radius.
- A faster aircraft has a lower rate of turn.
- A slower aircraft has a smaller turn radius, provided it remains safely above stall speed.
This is why the same bank angle can produce noticeably different results at different airspeeds.
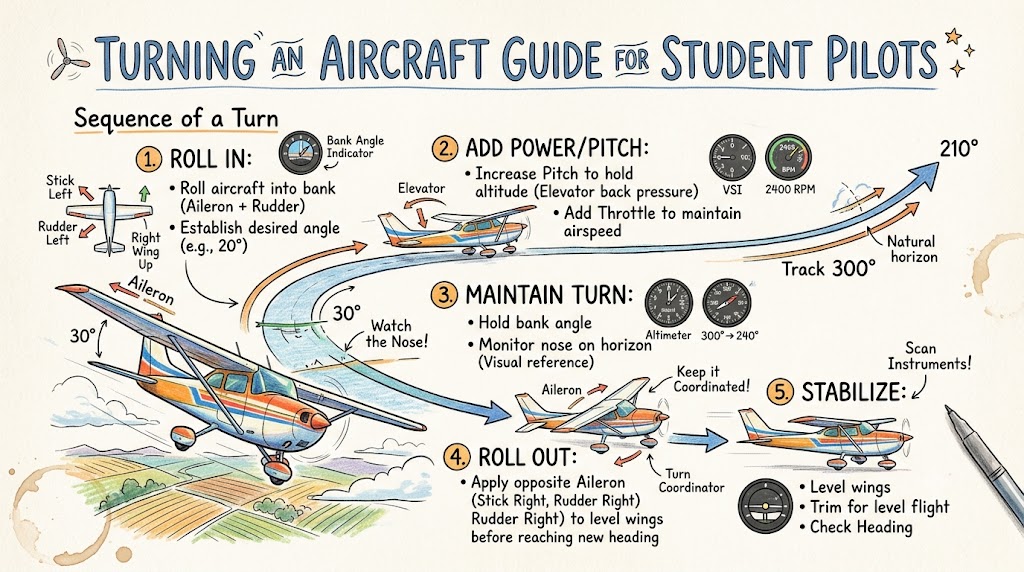
Step-by-Step Process for a Level Turn
The following sequence explains the general concept of a level turn. It is not a substitute for aircraft-specific instruction.
Clear the surrounding airspace
Before turning, look for other aircraft and hazards. Your instructor may teach a specific clearing procedure based on local operating practices.
Do not rely only on traffic displays. They can support visual awareness, but they do not replace an effective outside scan.
Select a heading or outside reference
Choose the heading on which you plan to roll out. During visual flight, also identify a suitable point on the horizon.
This gives you both an outside reference and an instrument reference.
Stabilise the aircraft
Check that the aircraft is in the intended configuration and that altitude, airspeed, power, and trim are appropriate.
Beginning from a stable condition makes deviations easier to recognise and correct.
Apply coordinated aileron and rudder
Smoothly apply aileron in the desired direction while adding suitable rudder pressure.
The goal is to roll without allowing the aircraft to slip or skid.
Establish the desired bank
Watch the relationship between the nose, wings, and horizon. Cross-check the attitude indicator when installed and appropriate.
Avoid chasing an exact bank angle with rapid or abrupt inputs.
Neutralise the ailerons
As the desired bank is reached, reduce the original aileron pressure. The controls should normally return close to neutral, with only small adjustments used to hold the bank.
Adjust pitch
Apply the elevator pressure required to maintain the desired flight path. In a level turn, this usually means enough back pressure to prevent altitude loss.
Use the horizon as the main visual reference and confirm performance with the altimeter and vertical speed indicator.
Maintain coordination
Check the inclinometer or slip-skid indication briefly while continuing to look outside.
Use smooth rudder corrections rather than pressing continuously without observing the result.
Maintain a balanced scan
Move your attention among:
- Outside horizon
- Bank angle
- Nose attitude
- Traffic
- Altitude
- Airspeed
- Heading
- Coordination
Avoid staring at one instrument.
Begin the rollout
Start rolling out before reaching the target heading because the aircraft continues changing direction while the bank is being removed.
The correct lead depends on bank angle, roll rate, airspeed, aircraft response, and pilot technique.
Coordinate the rollout
Apply aileron and rudder in the direction opposite the turn. As the wings become level, reduce the rollout inputs.
At the same time, release the additional elevator pressure that was needed in the turn.
Confirm straight-and-level flight
Check:
- Wings level
- Correct heading
- Stable altitude
- Appropriate airspeed
- Balanced coordination
- Suitable power setting
Entering a Turn Correctly
A good turn begins before any control is moved.
First, clear the area. Look in the direction of the planned turn and check for traffic above, below, and along the expected flight path. Then select the intended bank angle and rollout heading.
Apply aileron and rudder together smoothly. The exact relationship between the two inputs differs among aircraft. A trainer with significant adverse yaw may require more noticeable rudder coordination than another design.
As the bank develops, monitor the nose against the horizon. Student pilots sometimes watch the wingtip so closely that they fail to notice the nose lowering. The wing position helps indicate bank, but the nose position is essential for pitch and flight-path control.
Maintaining a Coordinated Turn
In a properly coordinated turn, the aircraft is neither slipping toward the inside of the turn nor skidding toward the outside.
The inclinometer—often displayed as a ball in a curved tube—helps show coordination. When the ball is centred, the turn is generally coordinated. The phrase “step on the ball” reminds pilots to apply rudder pressure on the side where the ball is displaced.
The pilot should use this as a correction guide rather than stare continuously at the instrument. Outside attitude, control feel, and instrument indications should be combined. FAA guidance for steep turns similarly emphasises coordinated control and checking the ball in the turn-and-slip indicator or turn coordinator.
| Condition | Aircraft Behaviour | Ball Indication | General Response |
|---|---|---|---|
| Coordinated | Bank and yaw are properly matched | Ball centred | Maintain balanced controls |
| Slip | Bank is excessive for the rate of turn | Ball generally moves toward the inside or low wing | Adjust bank and rudder as instructed |
| Skid | Rate of yaw is excessive for the bank | Ball generally moves toward the outside or high wing | Reduce excessive rudder and correct coordination |
Corrections must be smooth and appropriate for the aircraft. Student pilots should learn the visual sensations and control relationships through dual instruction.
Slips and Skids Explained
A slip exists when the aircraft is banked too much for its rate of turn. The aircraft tends to move sideways toward the lower wing.
Some slips are intentional. For example, a properly performed forward slip may be used in an approved aircraft to increase descent without a large increase in forward speed. An intentional slip is a separate manoeuvre that requires aircraft-specific instruction.
A skid exists when the aircraft is yawing too rapidly for the amount of bank. The aircraft tends to move outward from the turn.
A skidding turn is especially concerning when the aircraft is slow and close to its critical angle of attack. If a stall occurs while the aircraft is uncoordinated, yaw can contribute to spin entry. FAA stall-awareness guidance specifically warns about excessive rudder being used to force an aircraft through an overshooting base-to-final turn.
The correct response to an overshoot is not to force the nose toward the runway with excessive rudder. A go-around is the safer choice when the approach cannot be completed in a stable, properly coordinated manner.
Rolling Out of a Turn
The rollout should be planned rather than delayed until the heading indicator reaches the target.
Begin the rollout early enough to account for the aircraft’s continuing turn. Apply coordinated aileron and rudder opposite the direction of the bank. As the wings approach level, smoothly reduce those control inputs.
At the same time, relax the extra elevator pressure used to maintain altitude. Holding the same back pressure after levelling the wings may cause the aircraft to climb.
Common rollout errors include:
- Starting too late and overshooting the heading
- Starting too early and stopping short
- Using aileron without coordinating rudder
- Releasing all back pressure abruptly
- Holding excessive back pressure after levelling
- Fixating on the heading indicator
- Allowing the aircraft to bank in the opposite direction
A smooth rollout ends with the wings level, the nose correctly positioned, and the aircraft stabilised on the desired heading.
Standard-Rate Turns
A standard-rate turn is primarily an instrument-flight concept.
For low- and medium-speed aircraft, it is normally defined as a turn at three degrees per second. At that rate, a complete 360-degree turn takes approximately two minutes. A half-standard-rate turn is about 1.5 degrees per second.
The turn coordinator or turn-and-slip indicator can show whether the aircraft is turning at the standard rate. The bank angle required changes with true airspeed: a faster aircraft generally needs more bank to achieve the same rate.
Rules of thumb may help pilots estimate an initial bank angle, but the correct indication, aircraft limitations, operating procedure, and instructor guidance take priority.
Shallow, Medium, and Steep Turns
Shallow turns
Shallow turns are useful for small heading corrections and gentle manoeuvring. They normally require light pressures and careful attention because the aircraft may tend to return toward wings-level flight.
Students should avoid creating a sequence of overcorrections while trying to hold a very small bank.
Medium turns
Medium turns are widely used in basic flight instruction. They allow students to practise coordinated entry, altitude control, outside reference use, rollout timing, and heading accuracy.
The aircraft may remain near the selected bank after the pilot neutralises the controls, although this varies by design and flight condition.
Steep turns
Steep-turn training develops precise aircraft control, division of attention, energy management, and awareness of increasing load factor.
As the bank becomes steeper, students normally need to anticipate:
- Greater elevator pressure
- More induced drag
- Possible power adjustment
- Faster heading change
- Greater sensitivity to pitch errors
- Increased stall speed
- Stronger need for coordination
The pilot should not attempt steep turns without appropriate instruction, sufficient altitude, suitable conditions, and compliance with the POH/AFM and training standards.
How Airspeed Affects a Turn
Imagine two similar aircraft using the same bank angle. One is flying significantly faster than the other.
The faster aircraft covers more distance during each second of the turn. Therefore, it follows a wider curved path and has a larger turn radius. The slower aircraft follows a tighter path, provided its speed remains safely above stall and the manoeuvre stays within approved limits.
Airspeed also affects control response. At lower airspeeds, the controls may feel softer and larger movements may be needed. However, aggressive control inputs near a stall can be dangerous. At higher airspeeds, the controls may feel more responsive, and abrupt movement can impose excessive aerodynamic loads.
Student pilots must avoid treating low speed as a way to make every turn tighter. Stall margin, load factor, wind, altitude, aircraft limitations, and manoeuvre purpose must all be considered.
How Wind Affects Ground Track
Wind does not change the basic aerodynamic relationship that makes an aircraft turn through the air, but it changes the aircraft’s path over the ground.
Three terms are helpful:
- Heading: The direction in which the aircraft’s nose points
- Flight path: The path travelled through the surrounding air mass
- Ground track: The path followed over the Earth’s surface
When performing a turn around a ground reference, the aircraft may have a higher groundspeed on the downwind side and a lower groundspeed on the upwind side. Maintaining a reasonably constant distance from the reference may therefore require varying the bank angle.
Wind also affects traffic-pattern turns. A tailwind on base can move the aircraft toward the extended runway centreline more quickly than expected. The pilot should anticipate the drift instead of making a rushed, steep, or skidding turn close to the ground.
Visual References and Instrument Cross-Checking
Visual flight manoeuvres should primarily be flown using outside references, supported by brief instrument checks.
Useful outside references include:
- Natural horizon
- Nose position
- Wing position
- Distant landmarks
- Intended rollout point
- Other traffic
Useful instrument checks include:
- Altimeter
- Airspeed indicator
- Heading indicator
- Attitude indicator
- Turn coordinator
- Vertical speed indicator
The aim is not to keep the eyes inside the cockpit until every indication is perfect. Instead, the pilot should develop a scan that uses outside attitude to control the aircraft and instruments to confirm the result.
Fixation is a common student difficulty. Looking at the altimeter for too long may cause the bank angle or heading to change unnoticed. Staring outside without checking the instruments may allow a gradual altitude or airspeed deviation.
Common Turning Mistakes
Failing to clear the area
The pilot begins the manoeuvre without adequately checking for traffic. Prevent this by making the traffic scan part of every turn rather than treating it as an optional step.
Using aileron without enough rudder
This can produce adverse yaw and an uncoordinated entry. Practise smooth, linked aileron and rudder inputs with an instructor.
Using excessive rudder
Too much rudder can cause a skid. Never use rudder to force the aircraft around an overshooting traffic-pattern turn.
Continuing to hold aileron
Once the desired bank is established, unnecessary aileron may increase the bank. Reduce the input as the aircraft reaches the selected attitude.
Allowing the nose to drop
The pilot concentrates on roll and fails to manage pitch. Use the nose-to-horizon relationship as a primary reference.
Pulling too hard
Excessive back pressure may cause a climb, reduced airspeed, an increasing angle of attack, or an accelerated stall.
Losing altitude
Altitude loss can result from insufficient back pressure, inadequate power management, excessive bank, or a weak instrument cross-check.
Gaining altitude
A climb can result from excessive elevator pressure or failing to release pressure during rollout.
Overbanking
The bank continues to increase because of control input, aircraft tendencies, distraction, or poor visual reference. Correct smoothly rather than making abrupt opposite inputs.
Rolling out late
Waiting until the target heading is reached before levelling the wings normally produces an overshoot.
Fixating on one instrument
A student may stare at the altimeter, bank indication, or heading. Use a continuous but unhurried scan instead.
Making abrupt corrections
Large control movements can destabilise the manoeuvre and increase load factor. Small deviations normally require small, smooth corrections.
Turning in the Airport Traffic Pattern
Traffic-pattern turns take place close to the ground, often while the pilot is changing power, configuration, airspeed, and altitude. They require disciplined control and strong situational awareness.
Departure to crosswind
Continue the climb and follow the airport’s published or instructed pattern procedure. Before turning, check for traffic and maintain the required climb attitude and airspeed.
Crosswind to downwind
Roll out at the correct spacing from the runway while accounting for wind drift. Avoid allowing the turn to become so wide that it creates a conflict with other traffic.
Downwind to base
Plan the turn based on runway position, wind, altitude, traffic, and descent profile. FAA training guidance describes a medium-bank turn from downwind to base in a normal rectangular pattern.
Base to final
Check final approach for traffic before turning. Anticipate how wind will affect the ground track.
If the aircraft overshoots the centreline, do not apply excessive inside rudder while holding opposite aileron. Do not tighten the turn beyond safe or approved limits merely to save the approach.
FAA guidance recommends abandoning the approach when rushing or making an excessively steep turn would be required.
Final approach
After rollout, establish a stable, coordinated approach. Confirm runway alignment, airspeed, descent path, configuration, and traffic status.
When the approach is unstable or safe alignment cannot be achieved, go around according to the aircraft checklist and instructor guidance.
Safety Checklist Before Practising Turns
Before beginning a training exercise, confirm the following with your instructor:
- The manoeuvre is authorised and understood.
- The aircraft is suitable for the planned exercise.
- The training area is appropriate.
- Adequate altitude is available.
- Weather and visibility are acceptable.
- Cloud clearance requirements can be maintained.
- The surrounding airspace has been checked.
- Fuel quantity is sufficient.
- Engine indications are normal.
- Seat belts and harnesses are secure.
- The aircraft is correctly configured.
- Airspeed is appropriate.
- Relevant limitations have been reviewed.
- Emergency and recovery procedures are understood.
- The instructor and student agree on control transfer procedures.
Student-Pilot Practice Tips
Use small, smooth inputs
Aircraft respond more predictably when control pressure is applied progressively. Avoid trying to correct every small movement immediately.
Look outside
During visual flight, the horizon provides essential information about pitch and bank. Instruments should support the visual picture rather than replace it.
Practise coordination consciously
During early lessons, think deliberately about using aileron and rudder together. Over time, the relationship becomes more natural.
Verbalise the manoeuvre
Quietly reviewing “clear, enter, coordinate, maintain, rollout, confirm” can help organise your actions.
Use chair flying
Rehearse the sequence on the ground. Imagine the horizon, control inputs, instrument cross-check, and rollout point.
Review each flight
After landing, write down what went well and what needs work. Focus on one or two improvements for the next lesson.
Study the correct aircraft information
Review the POH/AFM, checklist, flight-school procedures, and instructor briefing. Do not transfer techniques or limitations from one aircraft type to another without verification.
Sample Training Scenario
A student pilot named Ravi is practising medium-bank turns with his instructor in a designated training area.
Before the first turn, Ravi clears the area, selects a distant landmark, and confirms the aircraft is stable. He smoothly applies left aileron and rudder, but his attention remains fixed on the attitude indicator.
As the aircraft reaches the intended bank, Ravi fails to apply enough back pressure. The nose lowers slightly, and the aircraft begins losing altitude.
The instructor asks Ravi to look outside and compare the nose with the horizon. Ravi notices that the pitch attitude is lower than it was in straight flight. He smoothly corrects the pitch, checks the altimeter, and stabilises the turn.
During the second attempt, Ravi looks outside during the entry, neutralises the ailerons at the selected bank, and applies the required elevator pressure earlier. He makes brief checks of altitude, airspeed, heading, and coordination.
As the rollout heading approaches, Ravi starts levelling the wings early. He coordinates opposite aileron and rudder, releases the added back pressure, and finishes close to the selected heading and altitude.
The lesson is not that Ravi should memorise one exact control position. It is that he must recognise the aircraft’s attitude, observe its performance, and make small corrections using all available references.
Quick Aircraft Turning Checklist
- Clear: Check the airspace and direction of turn.
- Prepare: Confirm heading, altitude, airspeed, power, configuration, and reference point.
- Enter: Apply smooth aileron and coordinated rudder.
- Coordinate: Keep the aircraft from slipping or skidding.
- Maintain: Hold the selected bank, pitch attitude, altitude, and airspeed.
- Scan: Divide attention between the horizon, traffic, and instruments.
- Roll out: Apply coordinated opposite controls before the target heading.
- Confirm: Check wings level, heading, altitude, airspeed, power, and coordination.
Frequently Asked Questions
What makes an aircraft turn?
Banking tilts the aircraft’s total lift force. The horizontal component of the tilted lift pulls the aircraft into a curved flight path.
Which controls are used to turn an aircraft?
Ailerons establish and remove bank, rudder supports coordination, elevator manages pitch and altitude, and power may be adjusted to manage airspeed and energy.
Why is rudder needed during a turn?
Rudder helps counter adverse yaw and keeps the aircraft properly coordinated during entry, maintenance, and rollout.
What is a coordinated turn?
It is a turn in which bank and yaw are properly balanced, with no unnecessary sideways slip or skid. The inclinometer ball is normally centred.
What is the difference between a slip and a skid?
In a slip, the bank is excessive for the rate of turn. In a skid, the yaw or turning rate is excessive for the amount of bank.
Why does an aircraft lose altitude in a turn?
When the lift force tilts, less of it acts vertically. Without enough additional lift, the aircraft may descend.
Does stall speed increase during a steep turn?
Yes, when altitude is maintained. The increased load factor requires more lift, and the stall speed rises as load factor increases.
What is a standard-rate turn?
For low- and medium-speed aircraft, it is normally a turn at three degrees per second, completing 360 degrees in approximately two minutes.
When should a pilot begin rolling out?
The rollout should begin before the target heading. The amount of lead depends on bank angle, roll rate, airspeed, and aircraft response.
How does airspeed affect turn radius?
At the same bank angle, higher airspeed creates a larger turn radius, while lower airspeed creates a smaller radius, provided a safe stall margin is maintained.
Why are skidding turns dangerous near the ground?
If a stall occurs during an uncoordinated skidding turn, the yaw can contribute to rapid spin development. Near the ground, there may be insufficient altitude for recovery.
How can student pilots improve their turns?
Practise with an instructor, use smooth controls, look outside, maintain a balanced scan, rehearse procedures on the ground, and review errors after every lesson.
Key Takeaways
- An aircraft turns because banking creates a horizontal component of lift.
- Aileron, rudder, elevator, and sometimes power must be coordinated.
- The pilot must manage pitch as well as bank.
- Increasing bank in a level turn increases load factor and stall speed.
- Outside visual references should remain central during visual flight.
- Smooth control inputs produce more stable and predictable turns.
- Rollout must begin before the target heading.
- Excessive rudder must never be used to force an overshooting base-to-final turn.
- Aircraft-specific procedures and limitations always take priority.
- Flight manoeuvres should be learned with a qualified instructor.
Conclusion
Turning an aircraft safely requires much more than moving the control wheel or stick to one side. Student pilots must coordinate aileron and rudder, manage pitch and power, maintain visual awareness, monitor essential instruments, and anticipate the rollout. With structured instruction and regular practice, these actions gradually become one smooth and disciplined manoeuvre. LearnFlying.com can help students understand the principles, but practical turning exercises must always be completed under qualified supervision and according to the aircraft’s POH/AFM, approved checklists, local regulations, and flight-school procedures.

