
Introduction
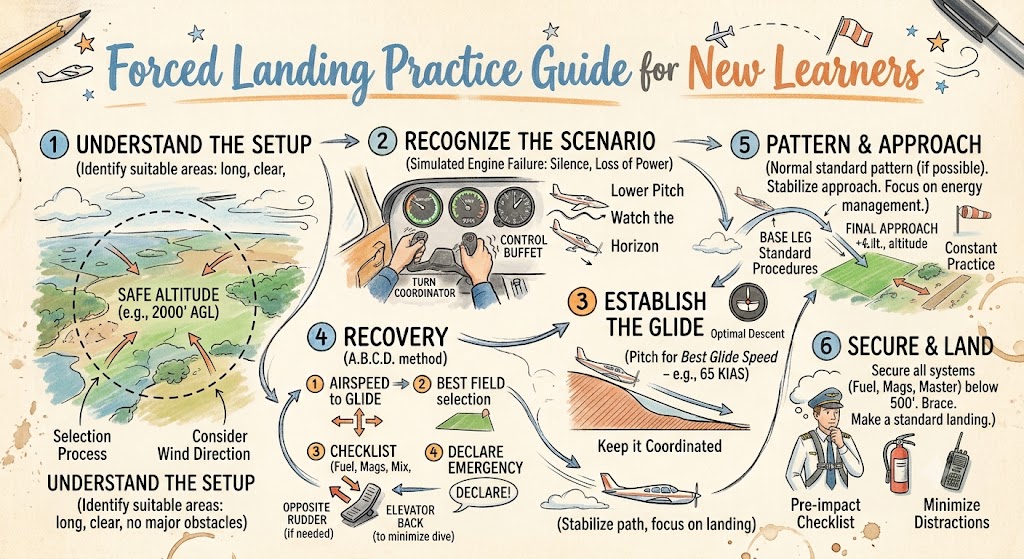
Forced landing practice is an important part of basic pilot training. It prepares student pilots to respond safely when an aircraft loses engine power or can no longer continue normal flight.
The main goal is not to restart the engine at any cost. The first responsibility is to maintain aircraft control, establish the correct glide speed, select a suitable landing area, and plan a safe approach.
A well-trained pilot follows a clear sequence instead of reacting in panic. Regular practice helps students develop better judgement, improve aircraft control, and understand how altitude, wind, terrain, airspeed, and aircraft configuration affect a powerless landing.
Forced landing exercises must be conducted under the supervision of a qualified flight instructor. Pilots must follow the aircraft flight manual, approved checklist, training syllabus, and applicable aviation regulations.
What Is a Forced Landing?
A forced landing is an emergency landing made when continued powered flight is no longer possible or reliable.
It may become necessary because of:
- Complete engine failure
- Severe partial power loss
- Fuel exhaustion
- Fuel starvation
- Mechanical failure
- Engine fire
- Propeller malfunction
- Serious aircraft damage
A forced landing is different from a precautionary landing. In a precautionary landing, the engine may still be operating, but the pilot decides to land because continuing the flight could become unsafe.
Examples include worsening weather, low fuel, failing daylight, or a developing mechanical concern.
Why Forced Landing Practice Matters
Forced landing practice teaches student pilots how to manage limited time, altitude, and landing options.
It helps develop:
- Best-glide control
- Field-selection skills
- Wind awareness
- Approach planning
- Checklist discipline
- Emergency communication
- Passenger management
- Situational awareness
- Calm decision-making
- Accurate aircraft handling
A pilot who has practised realistic forced landing scenarios is more likely to respond correctly during an actual engine failure.
The Main Priorities
A simple emergency priority order is:
- Aviate
- Navigate
- Communicate
Aviate
The first priority is to fly the aircraft.
After power loss, the pilot should:
- Lower the nose as required
- Establish the recommended glide speed
- Maintain coordinated flight
- Avoid excessive bank
- Prevent a stall
- Control the aircraft’s direction
The pilot must accept that altitude will be lost. Pulling back to prevent descent can reduce airspeed and create a stall.
Navigate
The next priority is selecting where the aircraft will land.
The pilot should:
- Identify available landing areas
- Consider wind direction
- Avoid obstacles and terrain
- Turn toward the selected field
- Plan a structured approach
- Keep the landing area in sight
Communicate
Once the aircraft is controlled and a landing plan is developing, the pilot should communicate when workload permits.
Information may include:
- Aircraft identification
- Position
- Altitude
- Nature of the emergency
- Intended landing area
- Number of people onboard
- Fuel remaining
Communication is important, but it must not distract the pilot from flying the aircraft.
Establishing Best Glide Speed
Best glide speed is the aircraft-specific speed that provides efficient gliding performance after power loss.
Students must learn:
- The published best glide speed
- The correct glide attitude
- How quickly to establish it
- How aircraft weight may affect it
- How wind affects ground distance
- How turns influence glide performance
The correct speed must come from the aircraft flight manual or operating handbook.
Why Best Glide Speed Is Important
Flying too slowly can:
- Increase the angle of attack
- Reduce control effectiveness
- Increase stall risk
- Reduce glide distance
Flying too fast can:
- Increase drag
- Increase descent rate
- Reduce time available
- Cause the aircraft to land short
The pilot should establish the correct speed promptly and make only small, smooth corrections.
Lowering the Nose After Power Loss
During climb, the aircraft may already be in a nose-high attitude when the engine fails.
Without an immediate pitch change:
- Airspeed will decrease
- Stall warning may activate
- Control response may weaken
- The aircraft may stall
The pilot must lower the nose sufficiently to maintain safe airspeed.
This can feel uncomfortable because the aircraft begins descending, but maintaining airspeed is essential.
Selecting a Landing Area
Field selection should begin as soon as the glide is established.
A suitable landing area should provide the best available combination of:
- Sufficient length
- Suitable surface
- Clear approach
- Limited obstacles
- Favourable wind
- Safe slope
- Low risk to people
- Access for emergency assistance
The closest field is not always the safest field.
Types of Possible Landing Areas
Possible options may include:
- An airport
- Open agricultural field
- Dry flat ground
- Wide road
- Beach
- Empty open land
- Cleared construction area
Every option has risks. Roads may contain traffic, wires, signs, bridges, and vehicles. Agricultural fields may contain crops, ditches, irrigation equipment, or animals.
Students should learn to evaluate the whole landing area rather than focusing only on its open appearance.
Field Length
A longer field gives the pilot more room for:
- Approach errors
- Wind changes
- Flare
- Touchdown
- Braking
- Obstacle avoidance
However, a long field with major obstacles may be less suitable than a shorter field with a clear approach.
Field Surface
The surface should be evaluated carefully.
Possible surface conditions include:
- Grass
- Soil
- Gravel
- Sand
- Crops
- Waterlogged ground
- Uneven terrain
A smooth-looking field may contain hidden ditches, fences, rocks, or soft ground.
Field Slope
Landing uphill can reduce the ground roll, while landing downhill may increase it.
However, slope must be considered together with:
- Wind direction
- Field length
- Obstacles
- Surface condition
- Approach path
A strong headwind may sometimes be more important than a slight slope.
Obstacles
Pilots should look for:
- Power lines
- Trees
- Buildings
- Fences
- Poles
- Vehicles
- Livestock
- People
- Ditches
- Irrigation systems
Power lines can be particularly difficult to see. Their presence may be suggested by poles, roads, or nearby buildings.
Wind Direction
Wind affects both glide distance and landing performance.
Landing into the wind generally:
- Reduces groundspeed
- Reduces landing distance
- Improves control during touchdown
However, a perfect into-wind field is not always available. Field length, surface, slope, and obstacles must also be considered.
Estimating Wind Direction
Possible wind indicators include:
- Windsocks
- Smoke
- Dust
- Flags
- Water movement
- Crop movement
- Known weather reports
- Drift during flight
Students should build the habit of monitoring wind before an emergency occurs.
Headwind and Tailwind Effects
A headwind reduces the distance the aircraft can travel over the ground during a glide.
A tailwind increases ground distance but also increases groundspeed at touchdown.
The pilot must consider wind when deciding whether a field is reachable.
Choosing a Field Early
Selecting a field early creates more time for:
- Planning the approach
- Completing checks
- Making emergency calls
- Briefing passengers
- Adjusting for wind
- Managing excess altitude
Waiting too long reduces available choices.
Avoiding Repeated Field Changes
New learners often select one field, then repeatedly change their decision.
This can cause:
- Poor positioning
- Lost altitude
- Unstable turns
- Checklist delays
- Increased workload
Once a suitable field is chosen, the pilot should normally remain committed unless it becomes clearly unsuitable.
Planning the Approach
A forced landing should be approached with a clear pattern rather than a direct dive toward the field.
A structured approach helps the pilot manage:
- Altitude
- Distance
- Wind
- Turn timing
- Flap use
- Final alignment
The exact pattern depends on the training method used by the instructor.
High-Key and Low-Key Positions
Some training programmes use high-key and low-key reference points.
These positions help the pilot estimate:
- Remaining altitude
- Distance from the field
- Turn timing
- Whether the approach is too high
- Whether the aircraft is too low
The exact altitudes and positions vary by aircraft and training organisation.
Students should use the method taught by their instructor.
Keeping the Field in Sight
The selected landing area should remain visible whenever possible.
Losing sight of the field can make it difficult to judge:
- Distance
- Height
- Wind drift
- Approach angle
- Obstacle clearance
Pilots should avoid positioning the aircraft where the field is hidden by the wing or cockpit structure for a long period.
Managing Excess Altitude
Arriving high is generally preferable to arriving low because excess altitude can often be reduced.
Approved methods may include:
- Extending the pattern
- Delaying the base turn
- Using flaps when the field is assured
- Using a forward slip when trained and approved
- Adjusting the aiming point
The pilot should avoid steep or aggressive manoeuvres close to the ground.
Managing Insufficient Altitude
If the aircraft is too low:
- Turn toward the field early
- Avoid unnecessary drag
- Delay flap extension
- Maintain best glide speed
- Avoid excessive manoeuvring
- Consider a closer field
The pilot must never pull back to stretch the glide.
Stretching the glide reduces airspeed, increases the angle of attack, and can cause a stall.
Flap Use During a Forced Landing
Flaps can help control the final approach, but they also increase drag.
Using flaps too early may cause the aircraft to land short.
Flaps should generally be extended only when the pilot is confident that the field is reachable.
The exact flap procedure depends on:
- Aircraft type
- Available height
- Wind
- Field length
- Obstacles
- Manufacturer guidance
Forward Slips
A forward slip can increase the descent rate without a large increase in airspeed.
It may help when the aircraft is too high.
A slip should only be used when:
- The aircraft is approved for it
- The pilot has received training
- Adequate height remains
- The manoeuvre can be completed safely
- The aircraft stays within its limitations
A student should never attempt an unfamiliar technique during a real emergency.
Restart Checks
After establishing the glide and selecting a landing area, the pilot may attempt an approved engine restart if time permits.
A restart checklist may include checking:
- Fuel selector
- Fuel quantity
- Mixture
- Fuel pump
- Carburettor heat
- Ignition or magnetos
- Throttle
- Engine instruments
The sequence must come from the aircraft’s approved checklist.
Restart attempts must not interfere with field selection or approach control.
When to Stop Troubleshooting
The pilot should stop restart attempts when landing preparation becomes the higher priority.
Troubleshooting should not cause the pilot to:
- Lose the selected field
- Allow airspeed to decay
- Miss an important turn
- Delay passenger preparation
- Ignore obstacles
- Fly an unstable approach
A controlled landing is more important than continuing repeated restart attempts.
Emergency Communication
When time permits, the pilot should make an emergency call.
The message should be clear and brief.
Useful information includes:
- Emergency declaration
- Aircraft call sign
- Position
- Altitude
- Nature of the problem
- Intended landing area
- Number of people onboard
The pilot may also set the appropriate emergency transponder code when available and when workload permits.
Passenger Briefing
Passengers should receive simple, direct instructions before landing.
The briefing may include:
- Tighten seat belts
- Secure loose objects
- Remove sharp items
- Adopt the brace position
- Keep clear of the controls
- Follow evacuation instructions
- Leave personal belongings behind
- Move away from the aircraft after landing
The pilot should remain calm and avoid creating unnecessary panic.
Securing the Aircraft
Before touchdown, the approved checklist may require actions involving:
- Fuel selector
- Mixture
- Ignition
- Electrical master
- Battery
- Doors
- Seat belts
- Flaps
The timing of these actions is important.
Systems should not be shut down so early that useful radios, lights, or flap controls are lost unnecessarily.
Final Approach
During the final approach, the pilot should focus on:
- Correct airspeed
- Stable descent
- Field alignment
- Obstacle clearance
- Coordination
- Controlled flap use
- Touchdown area
The pilot should avoid large last-minute corrections.
A stable approach to an imperfect field is safer than an unstable attempt to reach a better position.
Touchdown Technique
The objective is to touch down under control at the lowest suitable speed allowed by the aircraft and conditions.
The pilot should:
- Maintain directional control
- Avoid stalling too high
- Keep wings level when possible
- Select a safe touchdown point
- Use braking carefully
- Avoid major obstacles
- Protect the occupants
The exact technique may change depending on the surface.
Landing on Grass or Soft Ground
When landing on soft or rough ground, the pilot may need to:
- Touch down at minimum safe speed
- Keep the nose wheel light when appropriate
- Avoid heavy braking
- Maintain directional control
- Expect a short or sudden stop
Aircraft-specific guidance must be followed.
Landing in a Ploughed Field
A ploughed field may cause rapid deceleration or aircraft damage.
When possible, landing along the direction of the furrows may reduce the risk of the landing gear catching.
Wind, slope, obstacles, and field length must also be considered.
Landing on a Road
Roads can appear attractive but may contain:
- Vehicles
- Power lines
- Signs
- Bridges
- Streetlights
- Pedestrians
- Narrow sections
- Curves
A road should only be selected when it is clearly safer than available alternatives.
Landing Near Water
Water areas may create visual illusions and hidden hazards.
Pilots should consider:
- Shore distance
- Water depth
- Waves
- Wind direction
- Rescue access
- Emergency equipment
A ditching procedure must follow aircraft-specific guidance.
After the Aircraft Stops
After landing:
- Shut down remaining systems
- Evacuate when necessary
- Move away from the aircraft
- Watch for fuel leakage
- Avoid fire hazards
- Assist injured occupants
- Contact emergency services
- Use emergency equipment
The propeller should always be treated as potentially dangerous.
Common Mistakes During Forced Landing Practice
Failing to Establish Glide Speed
Students may begin searching for a field before controlling the aircraft.
Airspeed and attitude must be stabilised first.
Pulling Back to Reduce Descent
This reduces airspeed and can cause a stall.
Altitude cannot be preserved after engine failure by increasing the angle of attack excessively.
Selecting a Field Too Late
Late selection reduces planning time and forces rushed decisions.
Choosing the Nearest Field Without Evaluating It
The nearest field may have poor surface conditions, obstacles, or an unsuitable approach.
Changing Fields Repeatedly
Repeated changes increase workload and weaken the approach plan.
Ignoring Wind
A reachable field may become unreachable in a strong headwind.
Flying Too Fast
Excess speed increases descent rate and may reduce available glide time.
Flying Too Slowly
Low airspeed reduces control effectiveness and increases stall risk.
Extending Flaps Early
Early flap use can reduce glide distance and cause the aircraft to land short.
Attempting Too Many Restart Checks
Troubleshooting can distract the pilot from the approach.
Making Steep Turns
Steep bank increases load factor and stall speed.
Losing Sight of the Field
The pilot may become poorly positioned or misjudge the approach.
Forgetting Passenger Preparation
Passengers must be prepared for impact and evacuation.
Safety During Practice Exercises
Simulated forced landings must be conducted carefully.
Safety considerations include:
- Qualified instructor supervision
- Suitable training area
- Adequate weather
- Safe minimum recovery altitude
- Traffic lookout
- Clear landing area
- Engine-temperature monitoring
- Compliance with local regulations
- Prompt recovery when safety margins reduce
The instructor must ensure that engine power can be restored safely.
Simulated Engine Failure Practice
During training, an instructor may reduce power to simulate engine failure.
The student should practise:
- Establishing best glide speed
- Selecting a field
- Planning the pattern
- Completing restart checks
- Making a simulated emergency call
- Briefing passengers
- Configuring the aircraft
- Recovering when instructed
A simulated emergency should never be allowed to become an actual emergency.
Practice Forced Approaches at an Airport
Practising at an airport allows students to complete the full approach and landing in a controlled environment.
This helps develop:
- Height judgement
- Flap timing
- Glide control
- Wind correction
- Touchdown accuracy
- Approach planning
The exercise should follow instructor guidance and airport procedures.
Chair-Flying Practice
Students can rehearse forced landing procedures on the ground.
A useful mental sequence includes:
- Lower the nose
- Establish best glide
- Select a field
- Turn toward the field
- Complete restart checks
- Make the emergency call
- Brief passengers
- Secure the aircraft
- Fly the final approach
Chair flying builds memory without using aircraft time.
Scenario-Based Training
Instructors may create realistic scenarios involving:
- Engine failure after takeoff
- Engine failure during cruise
- Strong headwind
- Limited fields
- High terrain
- Radio failure
- Passenger distraction
- Low visibility
- Partial power loss
Scenario-based practice helps students develop judgement rather than simply memorising a checklist.
Forced Landing Practice Checklist
Before the Exercise
- Training area selected
- Weather suitable
- Safe recovery altitude confirmed
- Aircraft checks complete
- Emergency procedure reviewed
- Lookout completed
- Instructor instructions understood
After Simulated Power Loss
- Maintain aircraft control
- Establish best glide speed
- Select a landing area
- Turn toward the field
- Assess wind and obstacles
- Complete restart checks
- Plan the approach
- Make a simulated emergency call
- Brief passengers
- Prepare the aircraft
During the Approach
- Keep the field in sight
- Maintain correct airspeed
- Remain coordinated
- Avoid excessive bank
- Use flaps when the field is assured
- Adjust for wind
- Maintain a stable final approach
After Recovery
- Apply power smoothly
- Control pitch and yaw
- Retract flaps as recommended
- Establish climb speed
- Check engine instruments
- Return to a safe altitude
- Debrief the exercise
Frequently Asked Questions
What is the first action during a forced landing?
The first priority is maintaining aircraft control and establishing the recommended glide speed.
What is best glide speed?
Best glide speed is the aircraft-specific speed that provides efficient glide performance after engine power is lost.
Should the pilot attempt an engine restart immediately?
Only after the aircraft is controlled and a suitable landing area has been selected.
Can a pilot stretch the glide by pulling back?
No. Pulling back excessively reduces airspeed and increases stall risk.
When should a landing field be selected?
The field should be selected as early as possible after the aircraft is stabilised.
Should the pilot always land directly into the wind?
Landing into the wind is generally helpful, but surface condition, obstacles, slope, and field length may be more important.
When should flaps be extended?
Flaps should generally be extended only when the pilot is confident that the landing area is reachable.
What is a practice forced landing?
It is a training exercise in which the instructor simulates engine failure and the student plans a forced landing without completing an unsafe off-airport touchdown.
Why should steep turns be avoided?
Steep turns increase load factor and stall speed, which can be dangerous at low altitude.
Can a student pilot practise forced landings alone?
Practice should only be conducted when authorised, properly trained, and operating within instructor limitations and applicable regulations.
Conclusion
Forced landing practice teaches new pilots to maintain control, establish best glide speed, select a suitable landing area, plan a stable approach, and prepare the aircraft and passengers for touchdown. Regular instructor-led training, early decision-making, smooth control inputs, and disciplined checklist use are essential for managing a power-loss emergency safely.

