
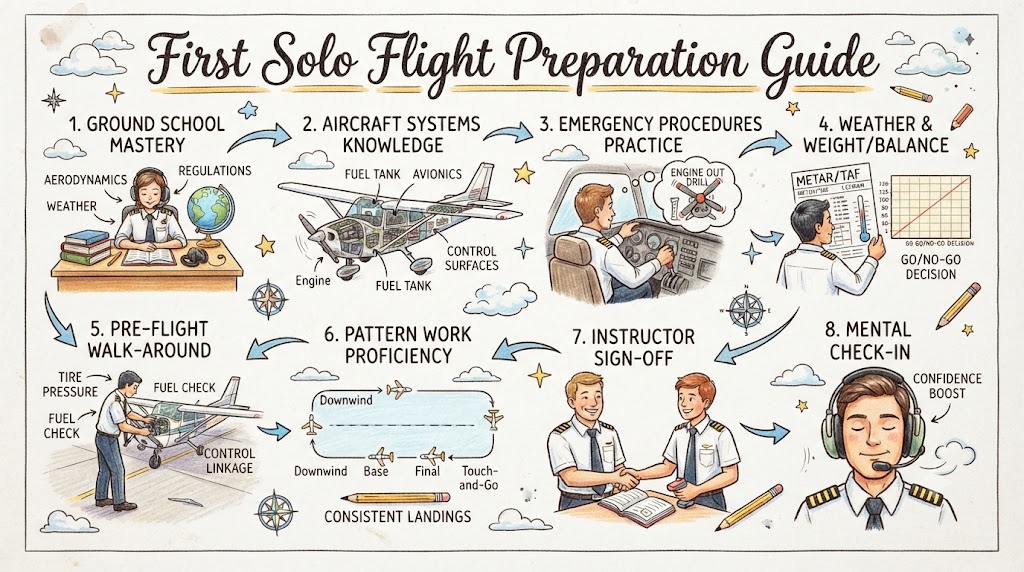
Introduction
A first solo flight is one of the most memorable milestones in pilot training. It is the first time a student pilot operates the aircraft without an instructor sitting beside them.
The flight is usually short and carefully planned, but it represents a major step forward. It confirms that the student can control the aircraft, make safe decisions, communicate properly, and manage normal airport operations independently.
Being excited or slightly nervous before a first solo is completely normal. Good preparation helps turn that nervous energy into concentration.
A student should never pressure themselves to fly solo before they are ready. The decision must be made by a qualified flight instructor after reviewing the student’s skills, judgement, consistency, and understanding of emergency procedures.
All solo preparation and flying must follow the aircraft flight manual, approved checklists, instructor guidance, training organisation procedures, and applicable aviation regulations.
What Is a First Solo Flight?
A first solo flight is normally a supervised training flight completed without an instructor onboard.
It may involve:
- Taxiing to the runway
- Completing pre-takeoff checks
- Taking off
- Flying the airport traffic pattern
- Making one or more landings
- Returning to the parking area
The exact flight profile depends on the airport, aircraft, weather, instructor, and training programme.
The instructor usually remains on the ground and may monitor the flight visually or by radio.
Why the First Solo Flight Is Important
The first solo is more than a training requirement. It demonstrates that the student has reached an important level of independence.
It shows that the student can:
- Prepare the aircraft safely
- Follow checklists
- Communicate with air traffic services
- Maintain situational awareness
- Fly a stable traffic pattern
- Manage takeoff and landing
- Recognise unsafe conditions
- Perform a go-around
- Respond to common abnormal situations
- Make decisions without direct cockpit assistance
The first solo also helps students build confidence for future training.
Who Decides When a Student Is Ready?
The flight instructor decides when a student is ready to fly solo.
The decision is based on more than one good landing. The instructor looks for consistent performance over several flights.
A student may be ready when they can:
- Complete normal takeoffs safely
- Maintain directional control
- Fly a stable climb
- Follow the traffic pattern accurately
- Maintain suitable airspeed
- Perform coordinated turns
- Fly stable approaches
- Land consistently
- Recognise an unstable approach
- Perform a go-around without hesitation
- Handle basic emergency scenarios
- Communicate clearly
- Use checklists correctly
The instructor must also be satisfied with the student’s judgement, attitude, and ability to manage pressure.
Technical Skill Versus Good Judgement
A student may have good control skills but still need more time before solo.
Safe solo flying requires both technical ability and sound decision-making.
Good judgement includes:
- Cancelling when weather is unsuitable
- Refusing an aircraft with an unresolved defect
- Going around after an unstable approach
- Asking for clarification when confused
- Avoiding rushed decisions
- Following personal and instructor limitations
- Maintaining safe separation from traffic
A pilot who makes conservative decisions is better prepared than one who tries to impress others.
Essential Skills Before the First Solo
Aircraft Control
The student should be comfortable controlling:
- Pitch
- Bank
- Yaw
- Airspeed
- Altitude
- Heading
- Trim
- Power
Control inputs should be smooth and coordinated.
Taxiing
The student should be able to:
- Follow taxi instructions
- Use correct taxi speed
- Maintain directional control
- Check brakes
- Observe signs and markings
- Avoid other aircraft and vehicles
- Perform a proper control check
- Hold at the correct location
Taxiing safely is an important part of the solo flight.
Takeoff
The student should know how to:
- Confirm runway alignment
- Apply power smoothly
- Maintain centreline
- Monitor engine instruments
- Use the correct takeoff attitude
- Establish the recommended climb speed
- Correct for wind
- Respond to an abnormal indication
Traffic-Pattern Flying
The student should be able to maintain:
- Correct pattern altitude
- Proper spacing
- Appropriate airspeed
- Accurate headings
- Coordinated turns
- Safe separation from traffic
- Correct radio calls
Approach Control
A stable approach normally includes:
- Suitable airspeed
- Correct configuration
- Manageable descent rate
- Proper runway alignment
- Appropriate power
- Coordinated flight
- A clear touchdown plan
The student must recognise when an approach is becoming unstable.
Landing
The student should demonstrate:
- Correct flare timing
- Directional control
- Crosswind correction
- Smooth power reduction
- Proper use of rudder
- Safe braking
- Centreline control
- Correct after-landing actions
Perfectly smooth landings are not required. Safe, controlled, and repeatable landings are more important.
Go-Around
A go-around is a normal safety manoeuvre, not a failure.
The student should be ready to go around because of:
- Unstable approach
- Excessive airspeed
- Low airspeed
- Poor alignment
- Runway obstruction
- Another aircraft
- Excessive bouncing
- Strong wind change
- Instructor or controller instruction
The student should know the correct sequence for power, pitch, rudder, flap management, climb speed, and communication.
Emergency Procedures
Before solo, the student should understand how to respond to common emergencies.
These may include:
- Engine failure during takeoff roll
- Engine failure after takeoff
- Partial power loss
- Radio failure
- Electrical problem
- Door opening
- Abnormal engine indication
- Brake problem
- Unusual vibration
- Unexpected traffic conflict
The exact procedure must come from the aircraft checklist and instructor training.
Instructor Approval and Required Authorisation
A student must not fly solo without the necessary instructor approval and training documentation.
Requirements vary between countries and training systems. They may include:
- Minimum training experience
- Instructor endorsement
- Medical eligibility
- Student pilot documentation
- Knowledge checks
- Aircraft-type training
- Airport-specific training
- Recent flight instruction
The instructor and training organisation should confirm that every requirement has been completed.
Preparing the Day Before the Flight
First solo preparation should begin before arriving at the airport.
Get Proper Rest
Fatigue can reduce concentration, reaction time, and judgement.
The student should:
- Sleep properly
- Avoid staying awake late
- Allow enough travel time
- Avoid unnecessary stress
- Arrive mentally alert
Avoid Alcohol and Unsafe Medication
Pilots should not fly when affected by alcohol, recreational substances, or medication that reduces alertness.
Students should ask an appropriate medical professional or aviation authority when uncertain about medication.
Review the Aircraft Checklist
Review important sections such as:
- Preflight inspection
- Engine start
- Taxi
- Before takeoff
- Normal takeoff
- Traffic pattern
- Landing
- Go-around
- Engine failure
- Radio failure
- Shutdown
The goal is familiarity, not careless memorisation.
Mentally Rehearse the Flight
Chair flying can help students prepare.
Mentally practise:
- Walking to the aircraft
- Completing the inspection
- Starting the engine
- Taxiing
- Making radio calls
- Taking off
- Flying the pattern
- Landing
- Going around when necessary
- Returning to parking
Mental rehearsal reduces hesitation during the real flight.
Prepare Personal Equipment
Useful items may include:
- Pilot documents
- Approved checklist
- Headset
- Kneeboard
- Pen
- Airport diagram
- Sunglasses
- Water
- Watch or timer
Avoid carrying unnecessary items that create cockpit clutter.
Weather Planning
Weather must be comfortably within the student’s solo limitations.
The student should review:
- Wind direction
- Wind speed
- Gusts
- Visibility
- Cloud base
- Temperature
- Crosswind component
- Turbulence
- Rain or thunderstorms
- Forecast changes
The weather may be legally acceptable but still unsuitable for a first solo.
The instructor may choose calmer and more predictable conditions to reduce workload.
Wind Limitations
A student should know the maximum wind and crosswind limits authorised by the instructor.
Wind can affect:
- Taxi control
- Takeoff direction
- Climb path
- Traffic-pattern spacing
- Final approach
- Flare
- Landing control
Students should not exceed their authorised limits even when the aircraft has higher published capabilities.
Visibility and Cloud
Good visibility helps a first-solo student:
- Locate the runway
- See other aircraft
- Maintain orientation
- Judge pattern spacing
- Recognise terrain
- Fly accurate visual references
Low cloud or changing visibility can increase workload and confusion.
Temperature and Aircraft Performance
High temperature can reduce aircraft performance.
Possible effects include:
- Longer takeoff roll
- Reduced climb rate
- Slower acceleration
- Lower engine performance
- Increased workload
Students should understand how temperature, altitude, aircraft weight, and runway length affect performance.
Reviewing Airport Information
Before the flight, review:
- Runway in use
- Runway length
- Taxi routes
- Holding points
- Pattern direction
- Pattern altitude
- Radio frequencies
- Noise-sensitive areas
- Nearby obstacles
- Local procedures
- Suitable emergency landing areas
Airport familiarity reduces unnecessary workload.
Aircraft Preflight Inspection
A first solo should begin with a careful preflight inspection.
The student should not rush because of excitement or pressure.
Important areas may include:
- Fuel quantity
- Fuel quality
- Oil level
- Tyres
- Brakes
- Flight controls
- Hinges
- Pitot tube
- Static ports
- Lights
- Propeller
- Engine cowling
- Landing gear
- Windscreen
- Doors
- Antennas
- Required documents
The approved aircraft checklist must be followed.
Fuel Inspection
Check:
- Fuel quantity
- Correct fuel grade
- Fuel-cap security
- Fuel contamination
- Water in the fuel sample
- Tank selection
- Evidence of leaks
Never assume the aircraft has enough fuel because someone else flew it recently.
Flight-Control Check
Confirm that the controls:
- Move freely
- Move in the correct direction
- Have no unusual resistance
- Are not blocked
- Match the cockpit indications
The control check should also account for wind during taxi and before takeoff.
Cockpit Preparation
Before starting the engine:
- Adjust the seat
- Secure the seat lock
- Fasten the harness
- Position pedals correctly
- Arrange the checklist
- Connect the headset
- Remove loose items
- Check doors and windows
- Confirm emergency equipment
- Set radios as appropriate
A secure seating position is essential for maintaining control.
Weight and Balance
Removing the instructor changes the aircraft’s weight and centre of gravity.
A lighter aircraft may:
- Accelerate faster
- Take off sooner
- Climb better
- Float more during landing
- Respond differently to control inputs
The student should expect the aircraft to feel different without the instructor onboard.
Weight and balance must remain within approved limits.
Why the Aircraft May Feel Different
During the first solo, the aircraft may surprise the student because it is lighter.
Possible differences include:
- Shorter takeoff roll
- Faster climb
- Greater sensitivity
- Different trim requirement
- Increased landing float
- Reduced power needed
The student should fly the approved attitudes and speeds rather than relying only on timing learned during dual flights.
Before-Start Briefing
Before starting, pause and confirm:
- Weather remains suitable
- Aircraft condition is acceptable
- Required documents are available
- The flight plan is understood
- Instructor approval is clear
- Personal condition is satisfactory
- No pressure is forcing the decision
This short pause helps prevent rushed starts.
Radio Communication Preparation
Students should be comfortable with expected radio calls.
Prepare likely calls for:
- Engine start when required
- Taxi request
- Holding position
- Takeoff clearance
- Pattern reporting
- Landing clearance
- Go-around
- Runway exit
- Taxi to parking
The student should listen carefully and write down complicated instructions when practical.
What to Do When a Radio Call Is Unclear
When unsure:
- Do not guess
- Ask for repetition
- State that you are a student solo when appropriate
- Read back important instructions
- Remain in a safe position
- Continue flying the aircraft
Clear communication is more important than sounding experienced.
Taxiing for the First Solo
Taxi slowly and deliberately.
Pay attention to:
- Wind direction
- Pedal use
- Brake response
- Other aircraft
- Ground vehicles
- Signs and markings
- Holding points
- Propeller clearance
Excitement can cause students to taxi too quickly. Maintaining a controlled speed provides more time to think.
Run-Up and Before-Takeoff Checks
Complete every check carefully.
Typical items may include:
- Parking brake or brake hold
- Flight controls
- Trim
- Fuel selector
- Mixture
- Engine run-up
- Ignition or magnetos
- Carburettor heat
- Engine instruments
- Flight instruments
- Radios
- Flaps
- Doors and windows
- Takeoff briefing
The exact sequence must follow the approved checklist.
Personal Takeoff Briefing
Before entering the runway, review:
- Runway
- Wind
- Takeoff direction
- Rotation or lift-off technique
- Climb speed
- Initial heading
- Engine-failure plan
- Rejected-takeoff plan
- Traffic considerations
A simple briefing helps organise the next actions.
Engine Failure Briefing
The student should know what to do if the engine fails:
During the Takeoff Roll
General priorities may include:
- Close the throttle
- Maintain directional control
- Brake as required
- Stop on the available runway
- Shut down if necessary
After Takeoff With Limited Height
General priorities may include:
- Lower the nose
- Maintain safe airspeed
- Land in the best available area ahead
- Avoid an unsafe turnback
- Complete essential actions when time permits
The exact plan must come from the instructor and aircraft procedure.
Taking the Runway
Before entering:
- Confirm clearance when required
- Check final approach
- Verify runway direction
- Align with the centreline
- Confirm heading indicator
- Check wind
- Check engine instruments
- Ensure the aircraft is ready
Avoid entering the runway while uncertain about any instruction.
The First Solo Takeoff
Apply power smoothly and maintain directional control.
Monitor:
- Engine sound
- Engine instruments
- Airspeed
- Runway centreline
- Wind correction
- Aircraft acceleration
Because the aircraft is lighter, it may lift off earlier than expected.
Do not force it into the air. Use the normal attitude and allow the aircraft to fly.
Initial Climb
After takeoff:
- Establish the recommended climb speed
- Maintain runway heading or assigned direction
- Use correct rudder
- Monitor engine instruments
- Maintain traffic awareness
- Complete after-takeoff checks when safe
Do not allow excitement to cause an excessive nose-high attitude.
Flying the Traffic Pattern
Use the same pattern procedures practised with the instructor.
Maintain:
- Correct altitude
- Correct headings
- Proper spacing
- Safe airspeed
- Coordinated turns
- Appropriate radio calls
- Continuous traffic lookout
Avoid rushing the pattern because the instructor is no longer onboard.
Downwind Leg
On downwind:
- Maintain pattern altitude
- Confirm runway position
- Complete landing checks
- Monitor spacing
- Check wind drift
- Prepare for descent
- Watch other aircraft
Do not become so focused on the checklist that traffic awareness is lost.
Base Turn
Begin the base turn at the normal reference point.
Avoid:
- Turning too early
- Turning too late
- Excessive bank
- Low airspeed
- Poor coordination
- Trying to force alignment
An overshoot should be corrected safely or followed by a go-around.
Final Approach
A stable final approach should include:
- Recommended airspeed
- Correct flap setting
- Proper runway alignment
- Controlled descent
- Suitable power
- Coordinated flight
- Manageable crosswind correction
If the approach is not stable, go around.
Landing During the First Solo
The lighter aircraft may float more than expected.
Students should:
- Maintain the correct approach speed
- Avoid forcing the aircraft down
- Look toward the far end of the runway
- Reduce power smoothly
- Control drift
- Use rudder for alignment
- Flare gradually
- Maintain directional control
Do not chase a perfect landing. Focus on safety and control.
Bounce Recovery
A small bounce may be recoverable with the correct technique, but a severe or repeated bounce should lead to a go-around.
Avoid:
- Pushing the nose down sharply
- Making large pitch changes
- Continuing after losing control
- Allowing the aircraft to porpoise
The student should follow the technique taught by the instructor.
When to Go Around
Go around when:
- The approach is unstable
- The aircraft is too high or low
- Airspeed is incorrect
- Runway alignment is poor
- Another aircraft is on the runway
- The landing begins badly
- The aircraft bounces significantly
- Wind changes suddenly
- The student feels uncomfortable
No explanation is needed before choosing safety.
After Landing
After touchdown:
- Maintain directional control
- Allow the aircraft to slow
- Use brakes appropriately
- Exit the runway safely
- Stop after clearing when required
- Complete the after-landing checklist
- Make the correct radio call
- Taxi carefully
Do not begin checklist actions while still controlling the aircraft at high speed.
Mental Preparation
Accept Normal Nervousness
Nervousness does not automatically mean a student is unprepared.
Mild nerves can improve concentration. The goal is to prevent anxiety from controlling decisions.
Focus on Familiar Procedures
The first solo should not involve new manoeuvres.
Use the same:
- Aircraft
- Runway
- Pattern
- Checklists
- Speeds
- Radio calls
- Visual references
Familiarity reduces workload.
Avoid Trying to Impress Anyone
Do not continue because:
- Friends are watching
- Other students have already soloed
- The instructor expects success
- A celebration has been planned
- The student feels embarrassed to stop
A safe cancellation is always better than an unsafe flight.
Use Positive Self-Talk
Useful reminders include:
- Fly the aircraft
- Follow the checklist
- Maintain airspeed
- Keep looking outside
- Take one step at a time
- Go around when necessary
Personal Fitness Check
Before the flight, assess:
- Illness
- Medication
- Stress
- Alcohol
- Fatigue
- Emotion
- Hydration
- Hunger
Do not fly when personal condition may reduce safety.
Common First Solo Mistakes
Rushing the Checklist
Excitement may cause students to skip steps.
Use the checklist deliberately.
Taxiing Too Fast
A slower taxi speed gives more time for signs, traffic, and instructions.
Forgetting the Aircraft Is Lighter
The aircraft may climb and float more than during dual training.
Overcontrolling
Nervous students may make excessive pitch, aileron, or rudder inputs.
Use small and smooth corrections.
Fixating on Instruments
Keep looking outside while making brief instrument checks.
Flying a Tight Pattern
A tight pattern can create steep turns and rushed configuration changes.
Use familiar spacing.
Flying Too Slowly
Trying to create more time can reduce control effectiveness and increase stall risk.
Maintain the approved speeds.
Continuing an Unstable Approach
A go-around should be started early rather than after the situation becomes difficult.
Trying to Make a Perfect Landing
Safe directional control and proper speed are more important than smoothness.
Forgetting Radio Calls
Use prepared call formats and listen carefully.
Becoming Distracted After Landing
The flight is not finished until the aircraft is parked and secured.
Situations That Should Delay the Solo
The first solo should be delayed when:
- Weather exceeds limitations
- Wind is uncomfortable
- The aircraft has an unresolved defect
- The runway condition is unsuitable
- The airport is unusually busy
- The student feels ill or fatigued
- Confidence is unusually low
- Required documents are missing
- Instructor approval is unclear
- Communications or equipment are unreliable
Delaying the flight is a responsible decision.
First Solo Flight Checklist
Before Arriving at the Airport
- Sleep properly
- Review procedures
- Check personal documents
- Prepare equipment
- Eat and hydrate
- Mentally rehearse the flight
Before the Flight
- Meet the instructor
- Review weather
- Confirm wind limits
- Review airport procedures
- Confirm instructor authorisation
- Inspect the aircraft
- Check fuel and oil
- Review emergency actions
- Confirm personal readiness
Before Takeoff
- Complete run-up
- Check flight controls
- Set trim
- Confirm flaps
- Review takeoff plan
- Review engine-failure plan
- Check traffic
- Confirm runway
- Verify clearance
During the Flight
- Maintain airspeed
- Keep looking outside
- Fly a normal pattern
- Make clear radio calls
- Monitor engine instruments
- Remain coordinated
- Go around when needed
- Avoid rushing
After Landing
- Maintain directional control
- Exit the runway safely
- Complete after-landing checks
- Taxi slowly
- Park correctly
- Shut down using the checklist
- Secure the aircraft
- Debrief with the instructor
Debriefing the First Solo
After the flight, discuss:
- Takeoff performance
- Pattern accuracy
- Radio communication
- Approach stability
- Landing control
- Wind correction
- Decision-making
- Areas for improvement
The debrief should identify both strengths and learning points.
A successful first solo does not mean training is complete. It marks the beginning of greater responsibility and more advanced skill development.
Frequently Asked Questions
How does a student know they are ready to solo?
A qualified instructor decides based on consistent aircraft control, safe judgement, emergency knowledge, communication skills, and regulatory requirements.
Is it normal to feel nervous?
Yes. Mild nervousness is common. Good preparation and familiar procedures help keep it manageable.
How long is a first solo flight?
The duration varies by airport, traffic, weather, and training programme. It is usually limited to familiar local operations.
Is a perfect landing required?
No. The landing must be safe and controlled. Consistency and good judgement are more important than perfect smoothness.
What happens when the aircraft is lighter?
It may accelerate faster, take off earlier, climb better, and float more during landing.
Can a student cancel a solo flight?
Yes. A student should delay or cancel whenever weather, aircraft condition, personal fitness, or confidence creates a safety concern.
What should a student do after an unstable approach?
Begin a go-around using the approved procedure.
What happens if a radio instruction is unclear?
Ask for repetition or clarification. Do not guess.
Can a student fly solo without instructor approval?
No. The required training, documentation, and instructor authorisation must be completed first.
What is the most important first-solo rule?
Maintain control of the aircraft, follow the approved procedures, and choose the safest action rather than trying to impress anyone.
Conclusion
The first solo flight is an important achievement that depends on preparation, consistency, sound judgement, and instructor approval. By reviewing the aircraft, weather, airport procedures, emergency actions, traffic pattern, and personal readiness, student pilots can approach the flight calmly and safely. The goal is not perfection but disciplined aircraft control and responsible decision-making.

