
Introduction
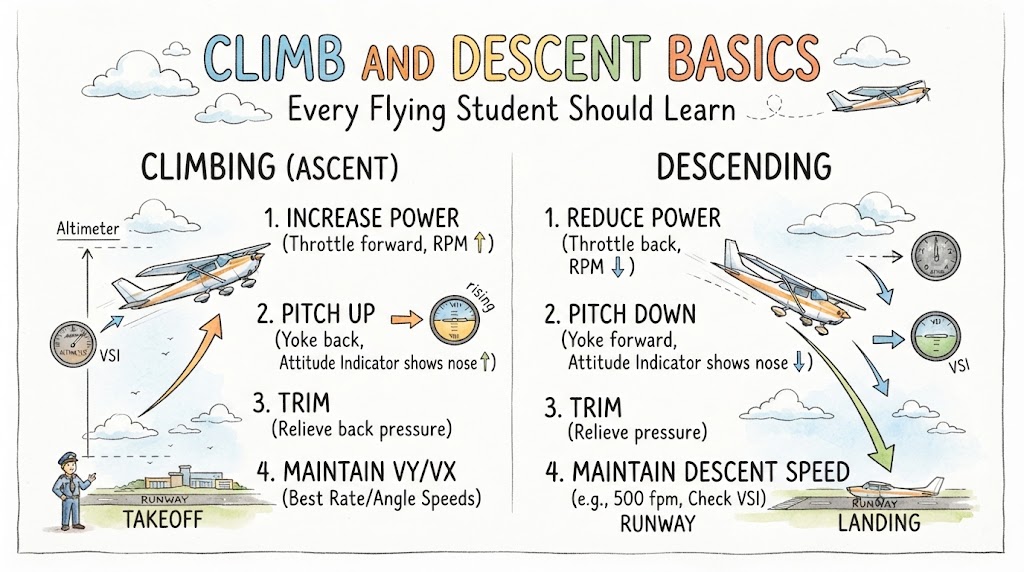
Climbs and descents are among the first major manoeuvres that flying students learn because they are used during almost every flight. A safe and controlled altitude change requires the pilot to coordinate pitch, power, airspeed, attitude and trim while continuing to monitor traffic, terrain, weather and aircraft performance. The objective is not simply to make the aircraft go up or down. A student must learn to enter the manoeuvre smoothly, maintain the intended flight path and level off accurately at the selected altitude.
Understanding Aircraft Climbs and Descents
A climb occurs when an aircraft gains altitude. A descent occurs when it loses altitude.
These manoeuvres are considered part of the fundamental skills of aircraft control, together with straight-and-level flight and turns. They help pilots control the aircraft through different phases of flight, including departure, cruise, arrival and landing.
Several terms are commonly used when discussing vertical flight:
- Rate of climb: The altitude gained during a specific period, usually shown in feet per minute.
- Rate of descent: The altitude lost during a specific period.
- Climb angle: The angle between the aircraft’s flight path and the horizon while climbing.
- Descent angle: The angle between the flight path and the horizon while descending.
- Vertical speed: The rate at which the aircraft is gaining or losing altitude.
- Flight path: The actual direction in which the aircraft is travelling through the air.
The aircraft’s vertical movement is influenced by its attitude, power, weight, airspeed, configuration and surrounding atmospheric conditions.
Pitch, Power, Airspeed and Trim
Pitch, power and airspeed are closely connected. Changing one normally affects the others.
During a climb, additional engine power provides energy that may be converted into altitude, airspeed or a combination of both. During a descent, the pilot normally reduces power or changes the aircraft’s attitude so that altitude is traded for forward movement.
The FAA describes altitude and airspeed control as an energy-management process. Pilots must plan, monitor and control both so that the aircraft follows the desired vertical flight path without becoming too slow, too fast, too high or too low.
A common training phrase is “pitch for airspeed and power for altitude,” but students should not treat it as an absolute rule. Elevator and throttle inputs work together, and the exact technique depends on the aircraft, its configuration and the flight condition.
| Flight Condition | General Pitch Trend | General Power Trend | Use of Trim |
|---|---|---|---|
| Normal climb | Nose raised to the required climb attitude | Increased to the recommended climb setting | Remove sustained control pressure after stabilising |
| Cruise climb | Moderate nose-up attitude | Appropriate climb power | Trim after airspeed and attitude stabilise |
| Level flight | Level-flight reference attitude | Cruise power | Trim for steady altitude and airspeed |
| Normal descent | Nose adjusted for selected descent speed | Reduced as required | Remove sustained forward or backward pressure |
| Approach descent | Attitude selected for approach speed and path | Adjusted to control the descent profile | Retrim after configuration or speed changes |
These are general relationships rather than fixed procedures. Pilots must follow their instructor’s method and the aircraft’s approved operating information.
Preparing for a Climb
Before starting a climb, the student should know why the climb is required, where it will end and whether the aircraft has enough performance to complete it safely.
The pilot should consider:
- The selected altitude
- Other aircraft in the area
- Airspace restrictions
- Cloud and visibility conditions
- Terrain and obstacles
- Aircraft weight and performance
- Engine limitations
- The required heading
- Air traffic control instructions
- The aircraft’s recommended climb speed
The area should be cleared before changing altitude. The pilot must look ahead, above, to both sides and, where practical, behind the aircraft.
A simple pre-climb flow may include:
- Confirm the intended altitude and heading.
- Check the surrounding area for traffic.
- Review airspace, terrain and weather.
- Confirm the aircraft configuration.
- Check engine instruments.
- Select an outside attitude reference.
- Apply the required power smoothly.
- Establish and maintain the appropriate climb attitude.
- Verify the resulting airspeed and performance.
This flow does not replace the aircraft checklist.
Normal Climb Procedure
A normal climb should be entered using smooth and coordinated control movements.
Establishing the Climb
Begin by looking outside and clearing the area. Apply the recommended power and adjust the pitch attitude toward the normal climb reference.
The pitch attitude should be established using outside visual references. The airspeed indicator is then used to confirm whether the attitude is producing the desired climb speed.
Maintaining Direction
Increasing power can produce yaw and other turning tendencies, particularly in single-engine propeller aircraft. The student may need coordinated rudder input to maintain the selected heading and keep the aircraft balanced.
Students often concentrate heavily on pitch and airspeed during their first climbs. However, heading, bank angle and coordination must also be monitored.
Stabilising and Trimming
Once the aircraft is holding the correct attitude and airspeed, trim should be adjusted to relieve continuous control pressure.
The correct sequence is:
- Set the power.
- Establish the attitude.
- Allow the aircraft to stabilise.
- Confirm the airspeed.
- Trim away sustained control pressure.
FAA guidance emphasises holding the required pitch attitude with elevator control and then trimming to maintain it without excessive pressure.
Trim should not be used as the primary control for raising or lowering the nose. First establish the correct attitude with the flight controls, then use trim to reduce workload.
Monitoring the Climb
During the climb, continue checking:
- Outside traffic
- Pitch attitude
- Airspeed
- Heading
- Bank angle
- Altimeter
- Vertical speed
- Engine temperatures and pressures
- Terrain and airspace
- Distance from clouds
The outside scan should remain the priority during visual flying.
Best Rate and Best Angle of Climb
Students must understand the difference between VX, VY and a normal cruise-climb speed.
VX — Best Angle-of-Climb Speed
VX provides the greatest altitude gain over a given horizontal distance.
It may be relevant when obstacle clearance is the primary concern. The aircraft covers less horizontal distance while gaining altitude than it would at a higher climb speed.
VY — Best Rate-of-Climb Speed
VY provides the greatest altitude gain in the shortest time.
It is normally associated with maximum rate-of-climb performance under the conditions for which the speed is published. FAA guidance distinguishes maximum angle of climb at VX from maximum rate of climb at VY.
Cruise-Climb Speed
A cruise climb may use a higher airspeed than VY. Depending on the aircraft, it can provide:
- Better forward visibility
- Improved engine cooling
- Greater passenger comfort
- Easier traffic observation
- Faster progress toward the destination
The exact values for VX, VY and cruise climb must come from the aircraft flight manual or pilot operating handbook. These speeds may vary with altitude, aircraft weight, configuration and operating conditions.
Levelling Off After a Climb
A good level-off begins before the aircraft reaches the target altitude.
Waiting until the altimeter shows the exact altitude usually causes the aircraft to climb above it because the aircraft has upward momentum and the instruments may not respond instantly.
A typical level-off sequence is:
- Anticipate the target altitude.
- Begin lowering the nose toward the level-flight attitude.
- Allow the aircraft to accelerate.
- Adjust power toward the required cruise setting.
- Maintain the selected altitude and heading.
- Retrim for level flight.
- Complete the appropriate after-climb checks.
Reducing power before allowing the aircraft to accelerate may produce an unnecessary loss of airspeed. Lowering the nose too quickly can lead to an uncomfortable level-off and an unwanted altitude loss.
The exact lead required depends on the rate of climb, aircraft responsiveness and operating conditions.
Types of Aircraft Descents
Not every descent is flown in the same way. The technique depends on the reason for descending and the required flight path.
Normal Descent
A normal descent is used to move from one altitude to another at a controlled rate and airspeed.
Cruise Descent
A cruise descent normally allows the aircraft to continue making useful forward progress while gradually losing altitude.
Power-Off Descent
In a power-off descent, engine power is reduced significantly or brought to idle, as appropriate for the aircraft and exercise. The aircraft’s attitude is adjusted to maintain the required airspeed.
Power-off exercises must be performed only under suitable conditions and with instructor supervision.
Approach Descent
An approach descent positions the aircraft for landing. It requires accurate control of:
- Airspeed
- Descent path
- Configuration
- Alignment
- Power
- Rate of descent
A stable approach is more important than forcing the aircraft to continue from an unsuitable position.
Emergency Descent
An emergency descent is used when circumstances require a rapid loss of altitude. Because the correct procedure varies greatly between aircraft, it must be learned from a qualified instructor and the aircraft’s approved documentation.
Planning a Descent
A well-planned descent is usually smoother and safer than a late, rushed descent.
Before descending, consider:
- Present altitude
- Required altitude
- Altitude to lose
- Available distance
- Groundspeed
- Wind direction and speed
- Terrain
- Airspace
- Traffic
- Weather
- Engine management
- Passenger comfort
- Air traffic control restrictions
- Time required to slow down or change configuration
Using the 3-to-1 Rule
The 3-to-1 rule is a mental planning method that estimates approximately three nautical miles of travel for every 1,000 feet of altitude to be lost.
For example, an aircraft needing to lose 4,000 feet would begin with an approximate planning distance of 12 nautical miles.
However, this is only a rough planning reference. FAA material discusses the 3-to-1 principle in descent and approach planning, but the actual top-of-descent point must account for aircraft performance, wind, groundspeed, power setting, restrictions and pilot technique.
A strong tailwind increases groundspeed and normally requires more horizontal distance to complete a comfortable descent. A headwind may reduce the ground distance travelled during the same period.
Students should use the descent method taught by their instructor rather than depending only on a mental rule.
Normal Descent Procedure
A normal descent begins with preparation, not with immediately lowering the nose or reducing power.
A general sequence is:
- Confirm the required altitude.
- Check terrain, airspace and traffic.
- Select a suitable descent point.
- Clear the area.
- Reduce power smoothly as required.
- Adjust pitch for the selected airspeed.
- Configure the aircraft as necessary.
- Allow the descent to stabilise.
- Trim away sustained control pressure.
- Monitor the descent path and altitude.
- Continue the outside traffic scan.
- Anticipate the level-off.
Reducing power without controlling pitch may allow the airspeed to decrease. Lowering the nose too much may cause the airspeed to increase rapidly.
A stable descent requires coordinated use of power and attitude.
Levelling Off After a Descent
The descent level-off should begin before reaching the selected altitude.
A typical sequence is:
- Raise the nose smoothly toward the level-flight attitude.
- Add power as required.
- Maintain heading and coordination.
- Allow the airspeed to stabilise.
- Confirm the selected altitude.
- Retrim the aircraft.
Adding power too late may cause the aircraft to continue descending below the selected altitude. Pulling back abruptly can produce an uncomfortable manoeuvre and a rapid airspeed reduction.
Students should learn to anticipate the level-off rather than react after passing the altitude.
Flight Instruments Used During Climbs and Descents
Flight instruments help confirm what the aircraft is doing, but they should support rather than replace outside visual references during visual flight.
Airspeed Indicator
The airspeed indicator helps confirm that the aircraft is maintaining the appropriate speed for the manoeuvre.
A low airspeed during a climb may indicate an excessive pitch attitude. Excessive airspeed during a descent may indicate that the nose is too low, the power is too high or the aircraft is not properly configured.
Altimeter
The altimeter shows altitude. It helps the pilot monitor progress and anticipate the level-off.
Vertical Speed Indicator
The vertical speed indicator shows the rate of climb or descent, usually in feet per minute. FAA material defines it as a static-pressure instrument displaying the rate at which altitude is changing.
The VSI may have a slight delay. Students should not chase every small movement of the needle.
Attitude Indicator
The attitude indicator displays aircraft pitch and bank attitude. It is especially useful when the natural horizon is unclear, but visual-flight students must continue looking outside.
Heading Indicator
The heading indicator helps the pilot maintain the intended direction during the altitude change.
Turn Coordinator
The turn coordinator helps identify unwanted bank and supports coordinated control.
Engine Instruments
Engine temperature, pressure, fuel and other system indications must be monitored during both climbs and descents. The correct instruments and limitations depend on the aircraft.
FAA guidance stresses that pilots must understand how to interpret and operate their flight instruments safely.
Correct Use of Trim
Trim reduces the physical pressure required to hold the aircraft in the desired attitude.
It does not replace the flight controls and should not be used to force the aircraft into a climb or descent.
The recommended learning sequence is:
- Use the flight controls to establish the attitude.
- Set the required power.
- Allow the aircraft to stabilise.
- Make small trim adjustments.
- Check whether unwanted pressure remains.
- Fine-tune the trim if necessary.
After power, airspeed or configuration changes, the aircraft will often need to be retrimmed.
A student who does not trim may become tired, use excessive control force and make inaccurate corrections. A student who overuses trim may allow the aircraft to move away from the intended attitude.
Factors Affecting Climb Performance
The climb performance shown in an aircraft manual is available only under the conditions stated in the performance information. Actual performance may be lower.
Important factors include:
Aircraft Weight
A heavier aircraft normally requires more lift and energy to climb. As weight increases, climb performance may decrease.
Density Altitude
Density altitude represents the effect of air density on aircraft performance.
High temperature, high airport elevation and certain pressure conditions can produce high density altitude. In less-dense air:
- The engine may produce less power.
- The propeller may be less effective.
- The wings may produce less lift at a given true airspeed.
- Take-off distance may increase.
- Climb performance may decrease.
FAA aircraft-performance guidance warns that decreasing air density and increasing density altitude reduce aircraft performance.
Aircraft Configuration
Extended flaps, landing gear or other configuration changes can increase drag and reduce climb performance.
Incorrect Airspeed
Flying slower or faster than the recommended climb speed can reduce the aircraft’s ability to gain altitude efficiently.
Wind
Wind affects the aircraft’s path over the ground. A headwind or tailwind does not directly change the basic rate of climb through the air in the same way that power and density altitude do, but it changes climb angle relative to the ground and affects obstacle-clearance planning.
Surface Condition and Contamination
Ice, frost or other contamination can seriously reduce aerodynamic performance. Students must follow approved procedures and never assume that small amounts are harmless.
Engine Management During Climbs and Descents
Engine operating procedures vary widely. Students must use the instructions approved for their aircraft.
General considerations include:
- Applying power smoothly
- Monitoring temperatures and pressures
- Using the correct mixture procedure
- Following carburettor-heat guidance when applicable
- Avoiding unnecessary abrupt power changes
- Considering engine cooling during prolonged descents
- Observing operating limitations
- Completing required checks
A prolonged high-power climb may produce increased engine temperatures. A long descent at very low power can create different temperature-management concerns in some engines.
There is no universal mixture, cooling or power procedure suitable for every aircraft.
Common Student Pilot Mistakes
Fixating Inside the Cockpit
Students may stare at the airspeed indicator, altimeter or VSI and stop looking outside.
Correction: Use short instrument checks and return attention to the outside environment.
Failing to Clear the Area
Changing altitude without checking for traffic creates collision risk.
Correction: Conduct an organised visual scan before and during the manoeuvre.
Using Excessive Pitch
Raising the nose too much may cause the airspeed to decrease toward an unsafe value.
Correction: Use the correct outside attitude reference and confirm it with the airspeed indicator.
Losing Directional Control
Power changes and incorrect rudder use can lead to yaw or unwanted heading changes.
Correction: Maintain coordinated flight using outside references and the appropriate instruments.
Forgetting to Trim
Continuous pressure makes precise control difficult.
Correction: Stabilise the aircraft, then trim.
Chasing the VSI
Repeatedly correcting small VSI movements can cause unstable pitch changes.
Correction: Hold a consistent attitude and use the VSI to confirm the overall trend.
Climbing or Descending Through the Target Altitude
This usually happens when the pilot begins the level-off too late.
Correction: Anticipate the altitude and begin the transition early.
Descending Too Late
A late descent may require excessive airspeed, power reduction or rate of descent.
Correction: Calculate a reasonable descent point and review it during the flight.
Allowing Excessive Descent Airspeed
Altitude can quickly turn into airspeed when the nose is lowered.
Correction: Set the correct attitude, adjust power and monitor aircraft limitations.
Using Abrupt Controls
Large pitch and power changes make the manoeuvre uncomfortable and difficult to stabilise.
Correction: Use smooth, measured control inputs.
Climb and Descent Comparison
| Flight Phase | Power Trend | Pitch Trend | Main Airspeed Concern | Primary Monitoring |
|---|---|---|---|---|
| Normal climb | Increased to the approved climb setting | Nose raised to climb attitude | Avoid becoming too slow | Airspeed, heading, engine instruments and traffic |
| Cruise climb | Appropriate climb power | Moderate nose-up attitude | Maintain the published or selected cruise-climb speed | Cooling, traffic, altitude and navigation |
| Normal descent | Reduced as required | Adjusted for selected descent speed | Avoid excessive acceleration or slowing | Altitude, airspeed, traffic and engine indications |
| Approach descent | Continuously adjusted as needed | Set for a stable approach path | Maintain the approved approach speed | Runway position, descent path, configuration and traffic |
| Level-off | Adjusted toward cruise or level-flight power | Returned smoothly toward level attitude | Prevent large speed changes | Target altitude, heading, airspeed and trim |
Safety During Vertical Flight
Safe climbs and descents require more than accurate instrument readings.
Students should continually consider:
- Other aircraft above and below
- Terrain and obstacles
- Stall awareness
- Cloud separation
- Weather changes
- Airspace boundaries
- Wake turbulence
- Engine indications
- Passenger comfort
- Air traffic control instructions
- Emergency landing options
- Aircraft limitations
During a climb, forward visibility may be restricted by the raised nose. Small clearing turns or other approved procedures may be required depending on the situation and instructor guidance.
During a descent, the pilot must avoid focusing only on the destination. Traffic, terrain and airspace remain important throughout the manoeuvre.
Instructor-Supervised Training Exercise
This exercise should be completed only with a qualified flight instructor in a suitable training area.
Learning Objectives
The student should learn to:
- Enter a climb smoothly
- Maintain the selected airspeed and heading
- Use trim correctly
- Level off at a selected altitude
- Plan and enter a descent
- Maintain a stable descent
- Return accurately to level flight
Exercise Sequence
- Establish straight-and-level flight.
- Select an altitude above the present altitude.
- Clear the area.
- Enter a normal climb using the approved procedure.
- Maintain the selected airspeed and heading.
- Trim the aircraft.
- Monitor engine instruments and traffic.
- Level off at the selected altitude.
- Stabilise in level flight.
- Select a lower altitude.
- Plan an appropriate descent point.
- Enter and stabilise the descent.
- Maintain the selected speed and heading.
- Level off at the lower altitude.
- Retrim and complete the required checks.
Student Self-Review
After the exercise, consider:
- Did I clear the area properly?
- Did I use smooth power and pitch changes?
- Did I maintain airspeed within the expected range?
- Did I control the heading?
- Did I trim after stabilising?
- Did I begin each level-off early enough?
- Did I divide attention between the cockpit and outside?
- Did I monitor engine instruments?
- Did I follow the aircraft checklist?
- What should I improve during the next flight?
Student Pilot Memory Checklist
Remember the following sequence during a normal altitude change:
- Look outside.
- Confirm the target altitude.
- Set the required power.
- Establish the correct attitude.
- Check airspeed.
- Maintain direction and coordination.
- Allow the aircraft to stabilise.
- Trim away pressure.
- Monitor instruments and traffic.
- Anticipate the level-off.
- Confirm altitude, heading and airspeed.
- Retrim for the new flight condition.
Frequently Asked Questions
1. What is the difference between climb angle and climb rate?
Climb angle describes altitude gained over horizontal distance. Climb rate describes altitude gained over time. VX relates to the best climb angle, while VY relates to the best climb rate under the published conditions.
2. What is VX used for?
VX is the best angle-of-climb speed. It provides the greatest altitude gain over a given horizontal distance and may be used when obstacle clearance is the main concern, subject to the aircraft’s approved procedure.
3. What is VY used for?
VY is the best rate-of-climb speed. It provides the greatest altitude gain in the shortest time under the conditions for which it is published.
4. When should a student begin levelling off?
The level-off should begin before reaching the selected altitude. The exact lead depends on the aircraft and the current climb or descent rate.
5. Why does airspeed increase during a descent?
When the nose is lowered, some of the aircraft’s altitude-related energy may be converted into airspeed. Power, drag and configuration also affect how quickly the airspeed changes.
6. How should trim be used during climbs and descents?
First establish the required attitude with the flight controls. After the aircraft stabilises, use trim to remove sustained control pressure.
7. Why is descent planning important?
Planning helps prevent rushed, steep or high-speed descents. It also gives the pilot time to manage traffic, weather, airspace, engine operation and aircraft configuration.
8. How does wind affect descent distance?
A tailwind increases groundspeed, so the aircraft covers more ground during a given descent time. A headwind normally reduces the ground distance covered. Wind must therefore be considered when choosing the descent point.
9. Why does climb performance decrease at high altitude?
Air density generally decreases with altitude. Reduced air density can lower engine, propeller and aerodynamic performance, resulting in a weaker rate of climb.
10. Why must students use aircraft-specific procedures?
Aircraft have different speeds, power settings, limitations, systems and handling characteristics. A technique suitable for one aircraft may be incorrect or unsafe in another.
Key Takeaways
- Climbs and descents are fundamental flying skills.
- Pitch, power, airspeed and trim must be coordinated.
- Use outside visual references together with instrument checks.
- VX and VY serve different climb-performance purposes.
- Published speeds must come from the aircraft’s approved documentation.
- Trim reduces control pressure but does not replace the flight controls.
- Plan descents early instead of making rushed corrections.
- Density altitude, weight and configuration affect climb performance.
- Monitor engine instruments during every altitude change.
- Anticipate level-offs to avoid passing the selected altitude.
- Continue scanning for traffic, terrain and weather.
- Practise only with proper instruction and supervision.
Conclusion
Learning the climb and descent basics for flying students requires repeated practice, accurate observation and smooth coordination of pitch, power, airspeed and trim. With guidance from a qualified instructor, students can gradually improve altitude control, situational awareness and confidence during every phase of flight. LearnFlying.com can support this learning by explaining essential aviation concepts in simple language, but practical training and aircraft-specific instructions must always remain the final authority.

